How do I create a manual backup?
If there is a need or preference for manual backup(s) instead of an automatic backup(s) (see Related Links below), you can choose to do a manual back up of all your Drake Tax files, including the Archive cabinet of Drake Documents, on an "as needed" basis. You can choose to back up to a local device, network drive, removable drive, or Drake Portals (see Related Links below for more information).
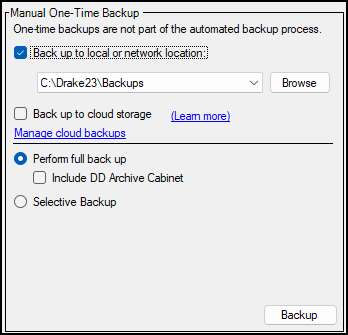
The Backup and Restore function is accessed from the main page of Drake, under Tools> File Maintenance> Backup.
To perform a Full manual backup:
- Mark the Backup to a local or network location box and, if necessary, click Browse to select a location.
- If you wish to use off-site storage, and you have a Drake Portals account, you can choose Backup to Cloud Storage (only available for Drake19 and future).
- Select the Perform Full Backup option.
- Select Include DDM (Archive Cabinet) if you wish to include the Drake Documents files in your backup.
- Click the Backup button to start the manual backup.
- While backup is running the message box shows "Backup in progress..." and then "Backup complete!" when it is done.
- When the backup is complete, click Close to return to the Backup and Restore dialog.
- When you are done with backup and restore, click the Close button to return to the Drake Tax Home window.
To create a custom or partial backup:
- Mark the Backup to a local or network location box, and, if necessary, click Browse to select a location.
- If you wish to use off-site storage, and you have a Drake Portals account, you can choose Backup to Cloud Storage (only available for Drake19 and future).
- Choose the Selective Backup option and click the Backup button.
- This opens the Create Selective Backup dialog, defaulted to Backup Everything.
- To customize, change to the Customize Backup option and all options will be enabled and available to you.
- Click the buttons on the left side of the dialog box to list the Drake Tax files on your computer. The button that you click determines the check boxes that appear in the grid list on the right side of the screen.
- All Drake Files - Is a non-filtered grid view of all Drake Tax files available for backup. These will include Tax Returns, Setup Files, and System Files found in the current year of Drake Tax.
- At the bottom right of the dialog, enter a custom name for the backup in the Backup Description field provided.
- To include Drake Documents files, mark the Include Full DDM Archive Cabinet check box.
- When you are done with your selections, click Backup.
- While backup is running the message box shows "Backup in progress..." and then "Backup complete!" when it is done.
- When the backup is complete, click Close to return to the Backup and Restore dialog.
- Click Exit to return to the main Backup and Restore dialog.
Note: If Drake is installed on a network drive, make sure none of the workstations are actively working on a return while you run the backup.
For information on Automatic Backups, backing up to Drake Portals, or how to Restore, see Backup & Restore and Related Links below.
On a scale of 1-5, please rate the helpfulness of this article
Optionally provide private feedback to help us improve this article...
Thank you for your feedback!