Choose from the following frequently asked questions about folders available in Drake Portals:
Can I add a custom folder to Drake Portals?
Both you and your client can add custom folders. Options vary depending on whether you are accessing Drake Portals from the website or the Drake Tax Integration inside Drake Documents.
You can add a custom folder in the following locations:
- Documents from Preparer, Documents to Preparer, or Office Use Only default folders in a client folder (website or Drake Tax).
- Note: You cannot create a custom folder in the main client folder, only in the default folders.
- Public folder (website only)
- Private folder (website only)
Your client can add a custom folder in the Documents to Preparer folder, only. You can change this option by going to the Drake Portals website > Account Settings > expand Advanced Settings > Storage section and toggling the selection Allow Client to create or edit folders.
Preparer Custom Folder
From your Drake Portals website:
- Expand the Clients menu.
- Select the client and open the client default folder in which you want to add a custom folder.
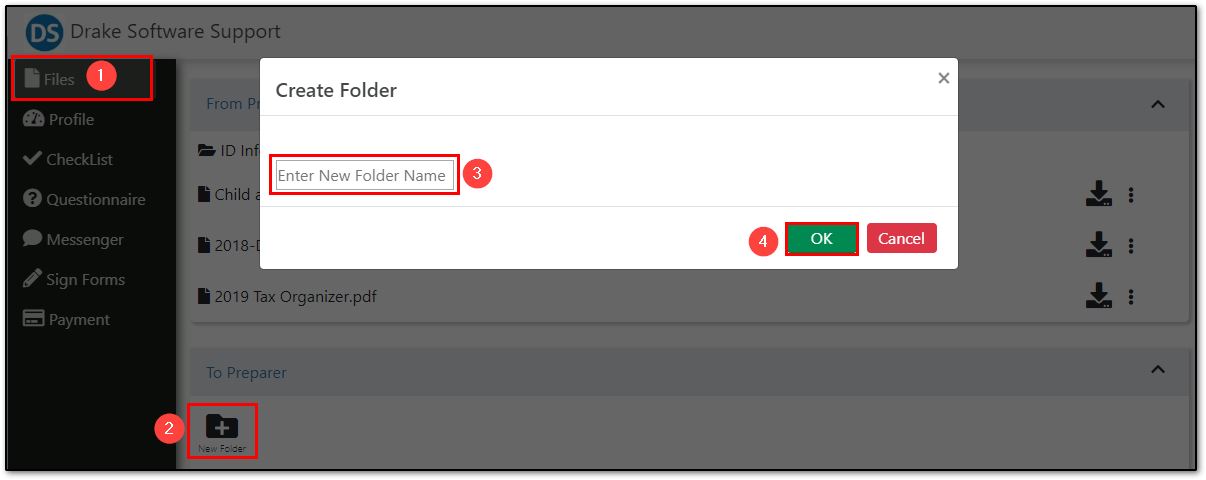
- Click the Add Folder icon.
- On the Create Folder window, name the new folder and click Submit.
- To rename or delete the new folder, locate the actions icon to the right of the folder and then select Rename Folder or Delete Folder (these options are not available for the client's default folders).
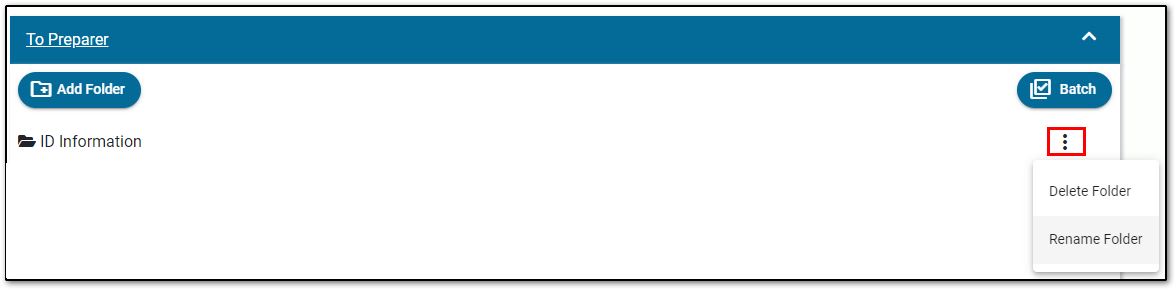
- When you are inside the sub-folder, it will show the main folder and then the sub-folder name on the menu. In this example, the custom folder called "ID Information" is located inside the To Preparer folder:

Additional sub-folders can be created, if needed.
From the Drake Portals pane of Drake Documents:
- Select the client on the left.
- In the Drake Portals pane, click on the Files tab and select the client default folder in which you want to add a custom folder.
- Right-click and select Create New Folder.
- Enter the New folder name and click OK.
To rename or delete the folder, select it in the Drake Portals pane and right click. Select Rename Folder or Delete Folder from the menu (these options are not available for the client's default folders). Note that deleting a folder removes all files within that folder.
Client Custom Folder
From their Drake Portals account, your client can add a custom folder to the Documents to Preparer folder by following these steps (unless turned off, see above):
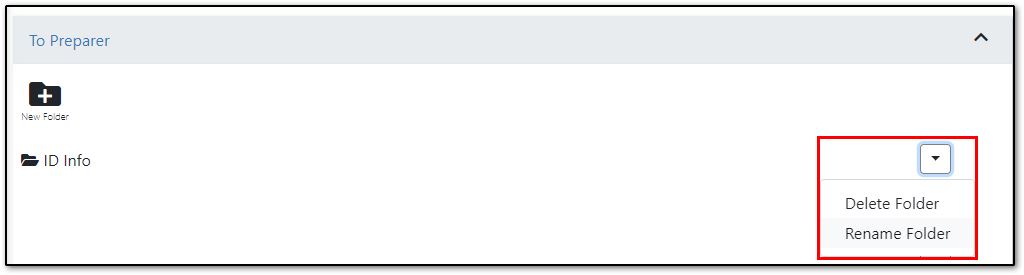
- On the Files tab, expand the To Preparer section and click the New Folder icon.
- This opens the Create Folder window.
- Enter the New Folder Name and click OK.
To Rename or Delete this folder, click on the menu button and choose either Delete Folder or Rename Folder. Note that deleting a folder removes all files within that folder.
How do I delete files from Drake Portals?
In Drake Portals, you can delete client files, individually or in a batch, without removing the folder that contains them.
Warning: Deleting a folder deletes all files within the folder. Deleted files and folders cannot be recovered.
To delete client files on Drake Portals website:
- Open your Drake Portals website to the Home window.
- Select the client for whom you want to delete files.
- Open the client folder that contains the files. The file name is displayed on the right.
- To delete:
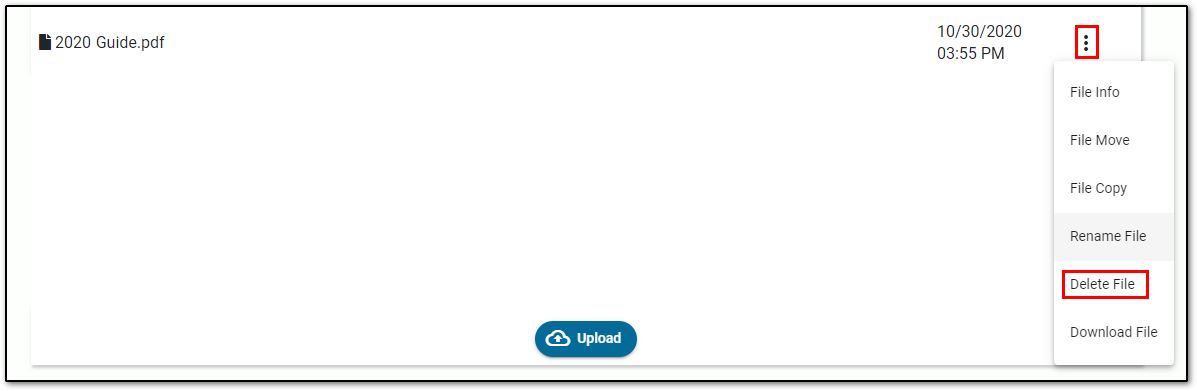
- A single file, use the actions icon to the right of the file name and choose Delete File.
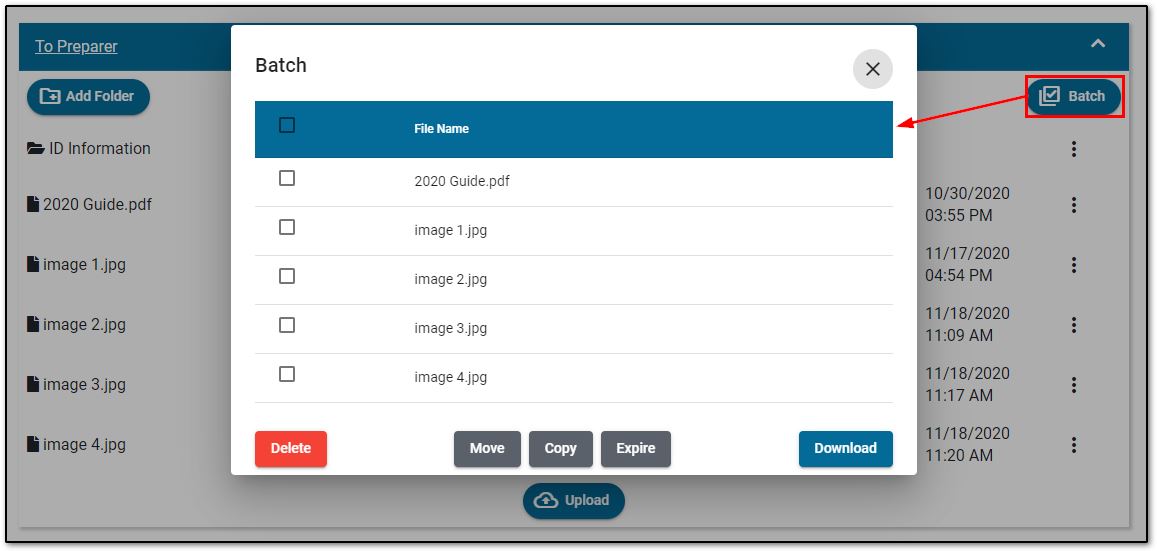
- Multiple files, click the Batch icon, put a check mark beside each file, then click the Delete button.
- You are prompted to confirm the deletion. Click Yes to proceed, or Cancel.
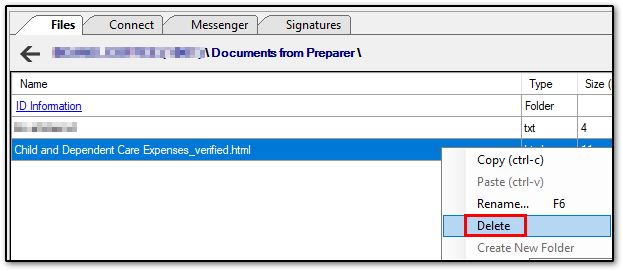
To delete files from the Drake Portals pane of Drake Documents:
- Navigate to the client folder.
- Select the File, right-click, and select Delete.
How do I copy files between folders?
Within each client folder, files can be copied between the client's default folders. Client files cannot be copied to a folder outside that client's folder. Copy creates a copy of the file in the destination folder and leaves the original in place.
Files located in either the Public or Private folder may be copied from one to the other.
Drake Portals website:
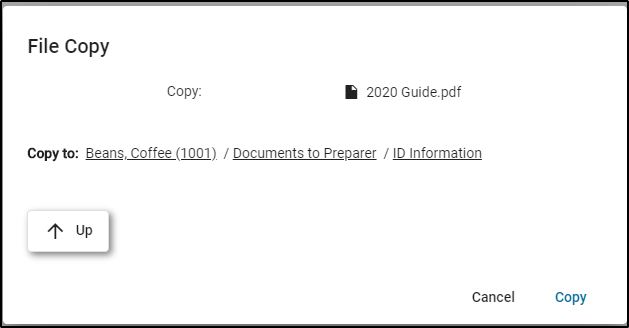
- Locate the file. On the file name line, click the actions icon and select File Copy.

- On the File Copy dialog box, the available destination folders are displayed. Select the destination folder and click Copy.
- If a file with the same name already exists in the destination folder, it will still copy it to the destination folder, but it will have a designation of (1), (2), (3), etc. next to the name.
Note: You can copy documents between the Public and Private folders and sub-folders, but you cannot copy a document from one primary client folder to another primary client folder (i.e. two different people/accounts/taxpayers). If you have unintentionally created two folders for the same client, you cannot move files between the two client folders. You would have to upload the files to the correct folder and delete the duplicate client account.
Drake Tax Integration:
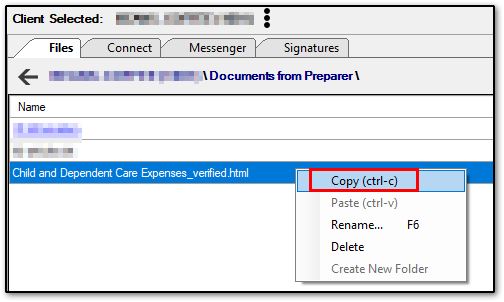
To copy files from the Drake Portals pane of Drake Documents to the client's Drake Documents folder, navigate to the Drake Portals pane, on the Files tab choose the applicable Folder. Select the File, right-click, and select Copy (or press CTRL + C).
How do I move a file in Drake Portals?
Note: Move deletes the original file and only leaves a copy in the destination folder.
To move a file from one folder to a sub-folder:
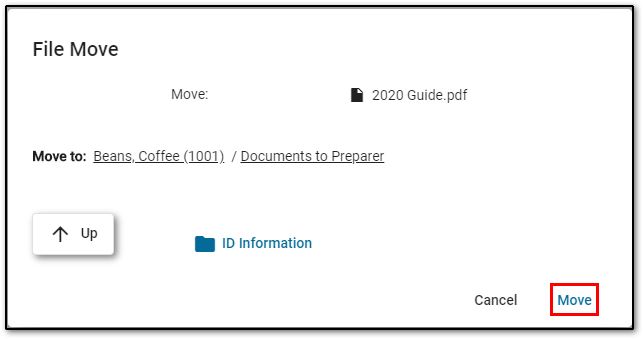
- On the Home window of your portal, locate the file that you want to move.
- To the right of the document you want to move, click on the actions icon and select File Move.
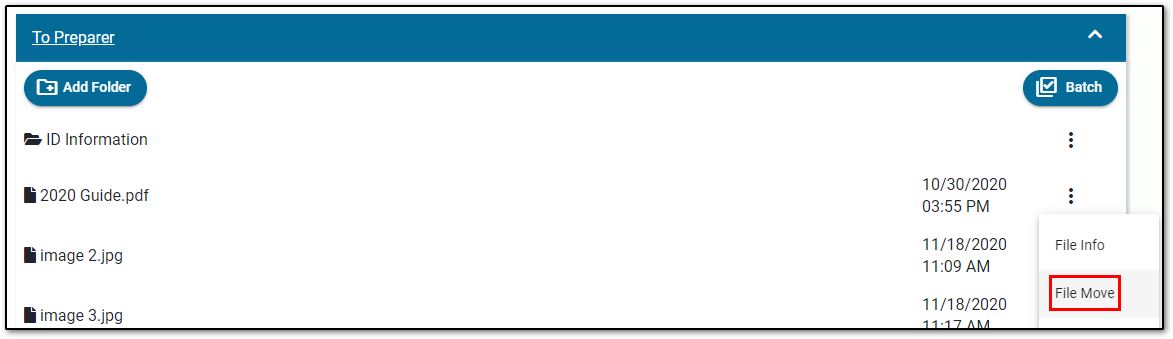
- The File Move dialog box displays the available folders. Select the destination folder and click Move.
How do the Public and Private folders work?
Both folders are accessible from the Home window on your Drake Portals website.
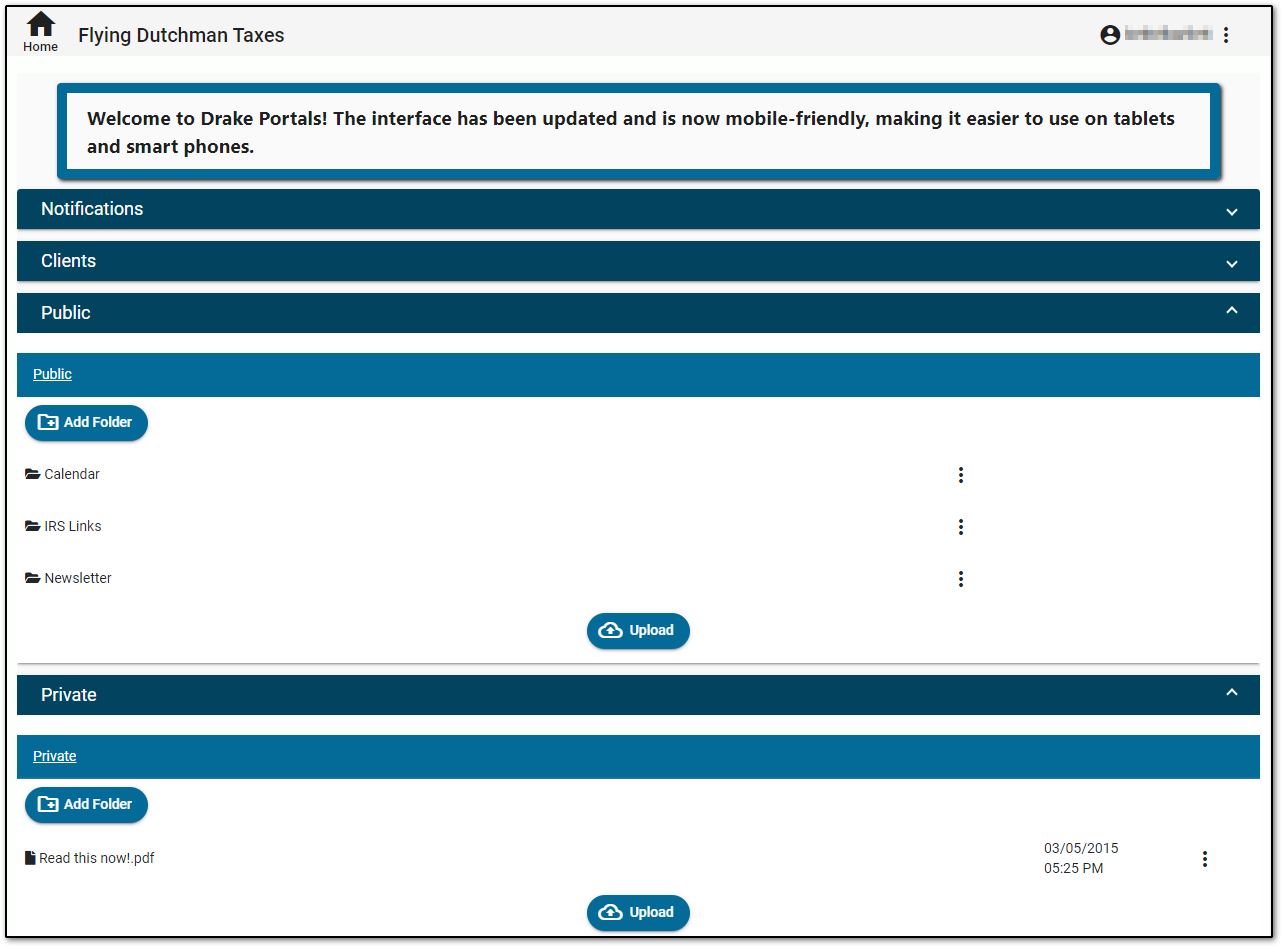
Public Folder
Any files or documents in the Public folder can be read by all employees and clients on the portal. Use this folder to upload documents that both your employees and clients may find useful. Things such as your privacy policy, your hours of operation, a required documents list, how to check the status of a refund online at the IRS website, client newsletter, etc.
Private Folder
Files and documents in the Private folder can only be read by office employees who have portal access. Use this folder to upload documents that employees may need. For example, if you have employees working off-site, a desk reference with common limits may be a document you would upload there. Other examples are project deadlines, documents a preparer may need to complete a return, employee schedules, employee newsletter, etc.
How do I upload items such as newsletter, engagement letter, privacy policy, or other informational documents to Drake Portals?
Drake Portals allows you to post informational documents for public review by anyone logged in to your portal, or for private review only by your logged in employees.
- The PUBLIC folder allows review by all clients and office employees with portal access. A PUBLIC folder document appears in every portal user's PUBLIC folder.
- The PRIVATE folder allows review only by office employees with portal access. A PRIVATE folder document appears only in employee PRIVATE folders.
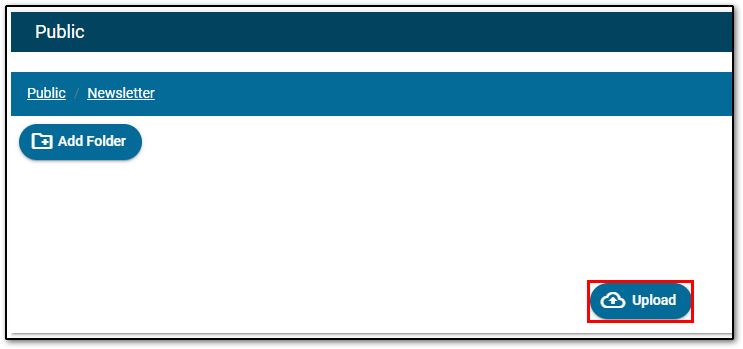
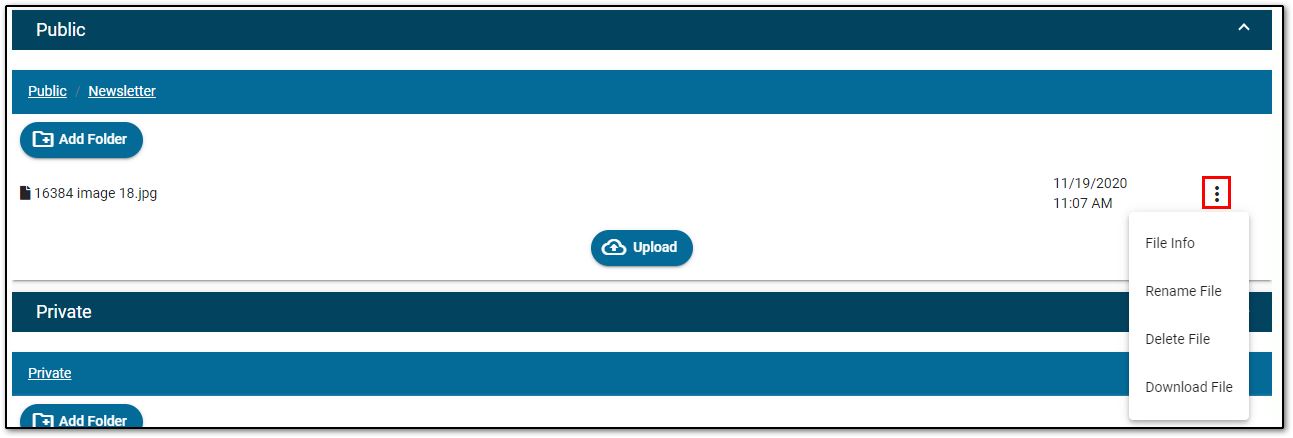
For the example below, three sub-folders previously were added to the PUBLIC folder, and a newsletter is uploaded to the Newsletter sub-folder of the PUBLIC folder.
- On the portal Home window, select the desired folder.
- To upload directly to the PUBLIC folder, select PUBLIC. To upload to a sub-folder, select that sub-folder. In this example, the Newsletter sub-folder is selected.
- Click Upload to open the File Upload dialog box. A warning will display indicating that the file will be accessible to all clients-- click OK.
- Browse to the file you want to upload and click Open.
- After each file selection, you are returned to the Upload Files screen. You can click Add to select additional files, cancel the upload for any selected file, or cancel the entire upload process. When all files are selected, click Upload File(s).
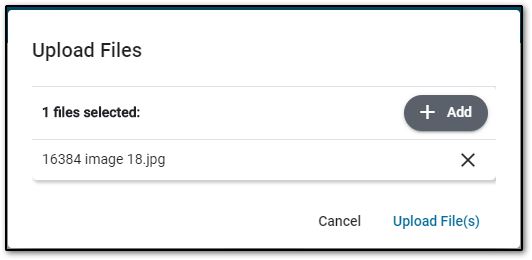
- The files selected are uploaded to the destination folder. You can view and edit the file details if needed.
Files located in either the Public or Private folder may be copied or moved from one to the other.