When do I need to attach a document to a return for e-filing and how is it done?
When e-filing a return, you may need to include a PDF attachment. There are two reasons that an EF message is produced requiring a PDF to be attached:
- A software attachment, one that the software identifies because of your data entry in the return. An EF message notifies you that an attachment must be made.
- A preparer attachment, one that you identify, at your discretion, by an entry on the PDF screen. A discretionary entry can be a signature document, a third-party document (such as an appraisal) or a document in columnar format. Your PDF screen entry produces an EF message that notifies you that an attachment must be made.
PDF Name Requirements
- A PDF name must only contain alphanumeric characters. No punctuation or special characters are allowed.
- If you include a space in the file name, ensure that there is only a single space between words or numbers.
- You cannot have two PDF attachments with the exact same file name for the same return.
For example a file can be named "Form 8949 1.pdf," but cannot be named
Form 8949_1.pdf
Form 8949 1.pdf (two consecutive spaces)
Form 8949-1.pdf
Form 8499(1).pdf
Clearing Messages
To clear a software attachment message, either
- Attach the required document.
- Or modify your data entry to avoid requiring the attachment.
- For Individual returns, you can also use a Paper Document Indicator for the required document, if available. For example, EF message 5982 requires that an attachment be made to the return when an 8283 form is generated, and reports a donation of over $20,000 in art. This message can be cleared by selecting the PDI indicator on the EF screen for Form 8283 (this also removes the required document from the PDF attachment screen in View) instead of attaching a PDF document to the return. Do not both attach a document and also select its PDI indicator.
To clear a preparer attachment message -
- EF Message 6300 (Individual package)/1511 (business packages), which indicates an incomplete PDF screen, is cleared by entering the information that is missing on the PDF screen.
- EF Message 5950 (Individual package)/1510 (business packages), which indicates a wrong file extension, is cleared by entering a ".pdf" file extension as part of the File Name on the PDF screen.
Note: The file must be a PDF document. Adding a .pdf file extension to a file that is not a PDF document will result in IRS reject X0000-029.
- EF Message 5952 (Individual package)/1512 (business packages), which explains how to make the attachment, is cleared by completing the attachment process.
- These EF Messages can also be cleared by removing your entry on the PDF screen.
Messages are cleared after you recalculate the return.
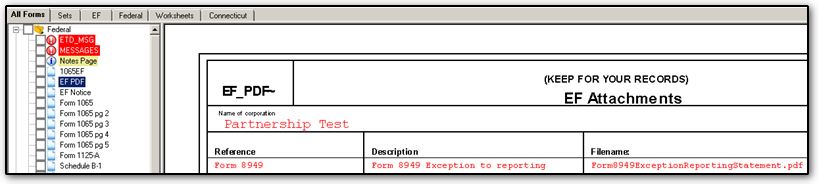
Below is an example of a partnership return with a software attachment and a preparer attachment. Note that
- Documents to be attached to a return must be in PDF format, a file format that can be read by Adobe Reader. If an attachment consists of multiple pages, all pages must be scanned or printed to a single, multipage PDF file.
- Instructions for making attachments are also available in red messages and on the FAQ screen.
View the EF PDF page to determine what needs to be attached. In this case, the software attachment already is listed because of data entry on screen 8949.
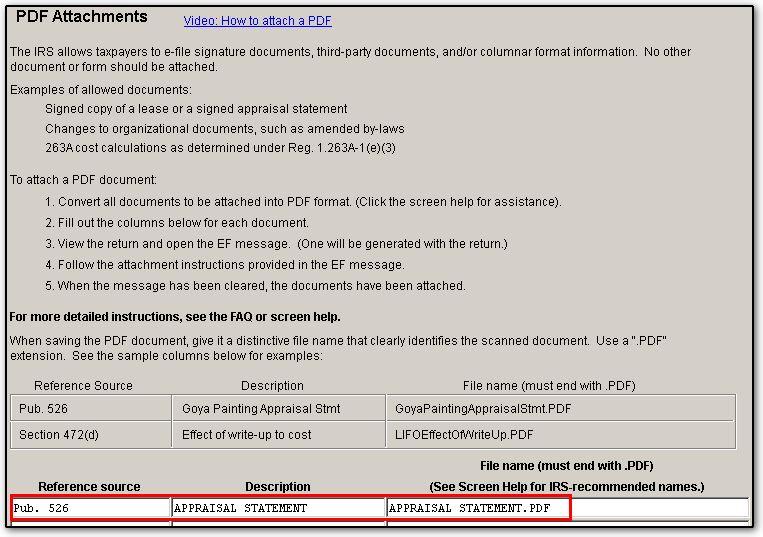
Preparer Attachment Process
To add a preparer attachment, return to data entry and open screen PDF. Enter the Reference Source, a Description and the File Name. The File Name you enter here must end with the ".pdf" extension, and it must exactly match the file name of the PDF document you want to attach.
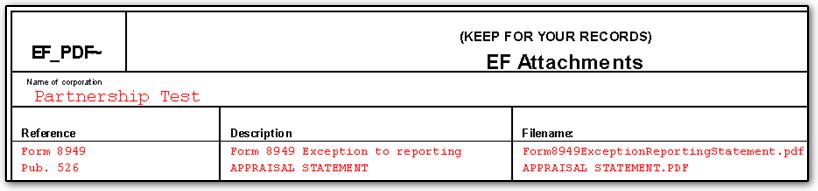
Exit the screen. View the EF PDF page again to confirm that the preparer attachment is now listed.
Creating the documents to be attached.
Create, name and save the PDF documents indicated on the PDF screen. Confirm that the names exactly match the Filename shown. Note the location where each document is saved so you can find it easily. If you password protect the PDF you will be prompted to enter the password when attaching to the return.
Attaching the PDF
View the return and click the Attach PDF button on the toolbar to open the EF PDF Attachments dialog box. The "X" indicates the attachments that have not yet been made.
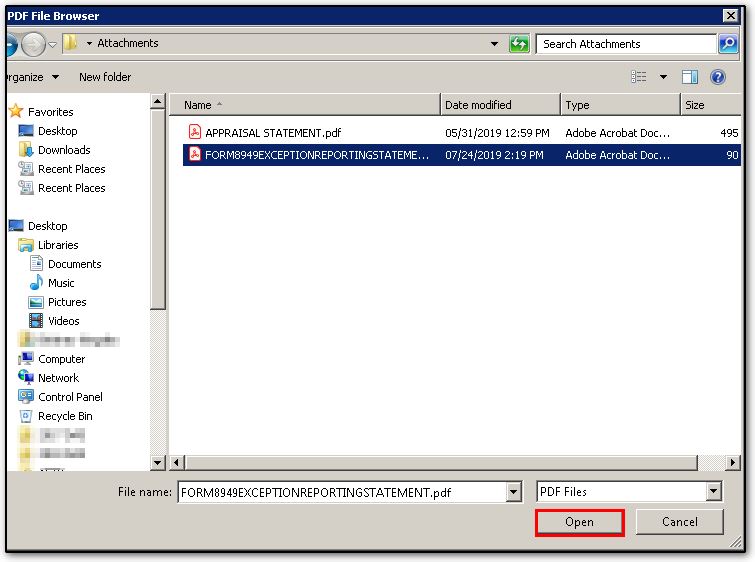
Select the first document and click Browse.
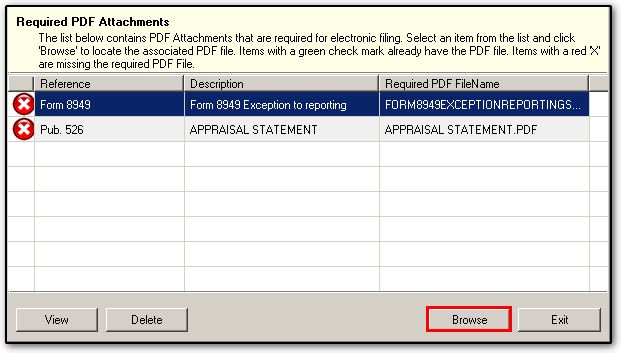
Navigate to the location where the first document is saved, select the document and click Open.
You return to the EF PDF Attachments dialog box. Confirm the check mark that indicates the document is attached.
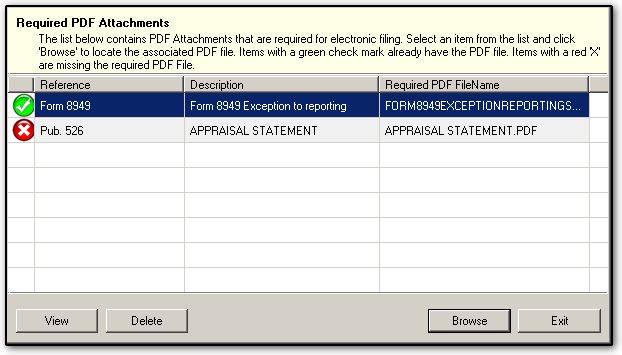
Repeat this process for the remaining attachments. When a check is displayed for all attachments, the process is complete. Associated messages are cleared when you recalculate the return.