Is it possible to import client payment information from an Excel, CSV or TAB delimited file to a client's bill? Also, can I enter the BILL information manually without having to open individual client returns?
Yes, use Tools > File Maintenance > Import Data to enter payment information for multiple clients directly into the clients' BILL screen by either:
- importing from an Excel (2007, 2010 or later) spreadsheet, or from a CSV or TAB delimited file
- or by direct entry without having to open the individual returns
To import client payment information from a spreadsheet
First prepare the spreadsheet with client payment information. Enter client payment data on the first page of a spreadsheet in the following format.
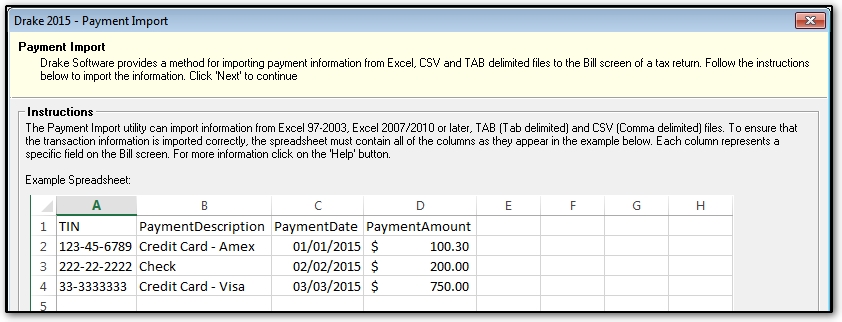
- General formatting - If you are entering data in an Excel spreadsheet, the Excel default General formatting can be used.
- Header row - optional. If you use a header row, start the import on line 2. If you don't use a header row, adjust to start the import on line 1.
- Columns - required. They must be in the order shown.
- TIN - dash separators are optional
- PaymentDescription
- PaymentDate - use eight digits and forward slash (/) or dash (-) separators.
- Payment Amount - the dollar sign is optional.
- Import does not overwrite existing payment information. Duplicate lines on a spreadsheet, or duplicate entries on more than one import, will appear as duplicates on a client's BILL screen after import.
Save the file to a location where you can easily find it and proceed to Step 1 of the import.
Complete Step 1
- From the Home window of Drake, click the Tools menu and select File Maintenance > Import Data.
- On the Import Data dialog box, select Return Preparation Payment Information (Excel, CSV, Tab Delimited) and click Next.
- The Payment Import dialog box opens. A sample spreadsheet is displayed. Be sure your spreadsheet matches the sample layout. Click Next when you're satisfied.
- The Payment Import - Step 1 dialog box opens. Click the Browse button, navigate to the spreadsheet and click Open. You return to Payment Import - Step 2.
Complete Step 2
Payment Import - Step 2 displays the spreadsheet for confirmation. The example below has a header row. If your spreadsheet does not include a header row, or includes a header of more than one row, use the Start import at drop list to select the first data row.
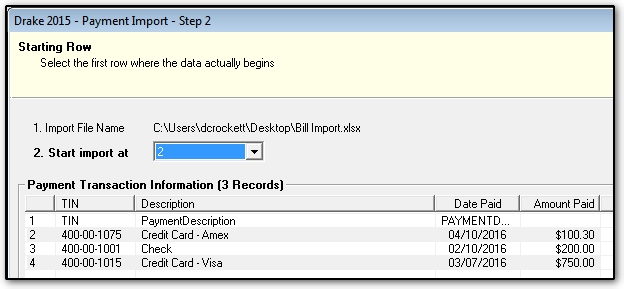
Click Next when satisfied. The Payment Import - Step 3 dialog box opens.
Complete Step 3
Payment Import - Step 3 displays the spreadsheet data as it will be imported into Drake. In the example, the first row of data below the header is the first row that will be imported.
- Note the date: it must be eight digits with slash separators.
- If erroneous data is displayed, click Back to change the first data import line, or Cancel to exit the import function and correct the spreadsheet.
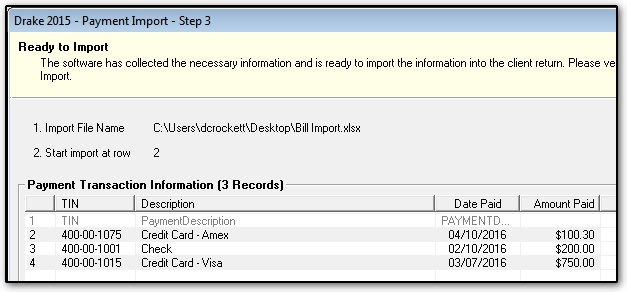
If everything is correct, click Import to import the data. After import, confirm the data in the client returns.
To directly enter client payment information
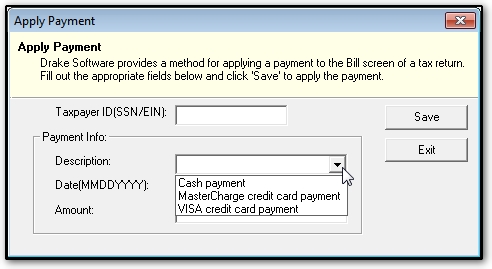
You can also enter client payment information on an Apply Payment dialog box for direct importation into the client's return. You can enter up to six payments for a given client, or less if any of the six BILL screen payment lines is already filled. The Apply Payment screen does not overwrite any existing payment information.
Open the Apply Payment dialog box
- From the Home window of Drake, click the Tools menu and select File Maintenance > Import Data.
- On the Import Data dialog box, select Return Preparation Payment Information (Manual Entry).
- The Apply Payment dialog box opens.
Enter client payment information
On the Apply Payment dialog box, enter a client's payment information.
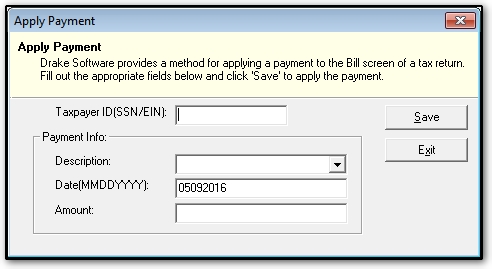
- Taxpayer ID(SSN/EIN) - 9 digits, no separators.
- Description - enter manually, or you can set up a drop list (see below) from which the description can be selected.
- Date(MMDDYYYY) - use eight digits, no separators.
- Amount - digits only. Do not enter dollar signs. For example, enter $20.50 as 20.50, $20.00 as 20.00 or 20.
When a client's payment is entered, click Save. At the prompt,
- confirm the client payment with Yes to import the data to the client's BILL screen and return to the Apply Payment dialog box to enter another client's payment
- or click No to return to the Apply Payment dialog box to correct entries.
Click Exit at any time to exit the Apply Payment dialog box. After completing data entry, confirm the data in the client returns.
To Set Up a Payment Description Drop List for the Apply Payment Dialog Box
Note: If you previously set up a drop list for customized bill payment descriptions, see the note below.
To define a customized drop list for the Apply Payment dialog box,
- Go to Setup > Options > Administrative Options (Admin login required) and click the second Customize button.
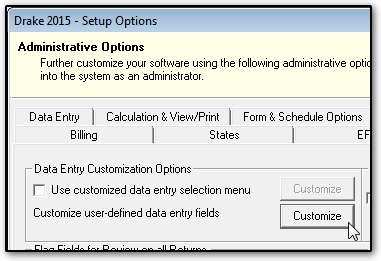
A dialog box opens.
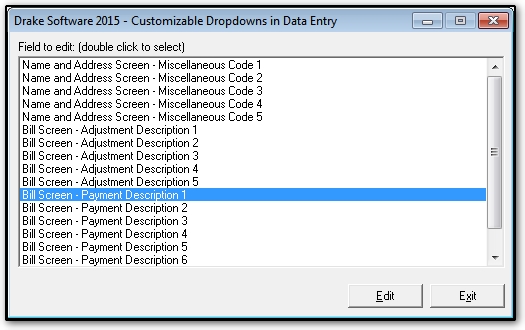
- From Customizable Dropdowns in Data Entry, select Bill Screen - Payment Description 1 and click Edit. The Edit Entries dialog box opens.
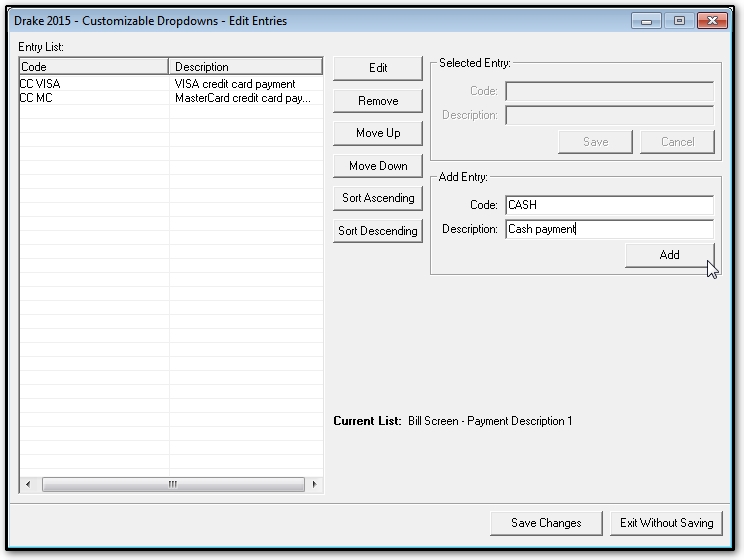
- In the Add Entry section, enter a Code and a Description. The Description is what the Apply Payment dialog box displays in the drop list. Click Add to add the entry. Note the dialog box tools that allow you to edit, sort and move entries on the drop list. Continue until the drop list is satisfactory, and then click Save Changes and exit from all open dialog boxes.
The drop list is now available in the first field on the BILL screen

and also on the Apply Payment dialog box.
Note: the Apply Payment dialog box imports payment information sequentially to any of the six payment lines that are blank on a client's BILL screen. If you previously set up a drop list for any Payment Description 2 through 6 and the import goes there, the imported data is treated as an invalid entry because it isn't on that list. This means that if you click the field on the BILL screen, you must press Ctrl+F to exit it unless you delete the imported data or replace it with a selection from that list.