How can I mark items on a taxpayer’s return that need to be reviewed or verified?
Beginning in Drake15, you can now mark as well as add notes to data fields as you review them in Enhanced View Mode, using the DoubleCheck® feature. It is available in all packages, federal, and state. This feature is not available in Basic View Mode.
As shipped, DoubleCheck® does not affect e-filing; however, if you mark the option Disallow EF selection if DoubleCheck Review flag exists by going to Setup > Options > EF, any return containing a DoubleCheck® "flag for review" cannot be selected for e-filing. The EF Status column in the Calculation Results window will show as "Flagged Fields", however the software will not produce an EF message.
DoubleCheck® is an Enhanced View Mode feature that complements the existing data entry field-flagging capability in Drake. DoubleCheck® does not generate a MESSAGES page. Data entry flagging can - see Related Links below.
DoubleCheck® gives you two options for marking fields in Enhanced View.
- Use the default left-click feature. By default, DoubleCheck® marks a data field when you left-click the field. You can disable the left-click option and use only the right-click menu. When left-click is disabled, it remains disabled in all returns until you again enable it.
- Use the DoubleCheck® right-click menu. You can always right-click in any data field and use the DoubleCheck® right-click menu selections to mark a field. You can also enable and disable left-click from this menu.
Both options are discussed below. DoubleCheck® icons and notes cannot be printed. They do not appear on a printed form and they are not part of an e-file transmission.
Using DoubleCheck® Left-Click to Mark Fields
Note: Remember that you can also use the right-click menu to perform these functions, whether left-click is enabled or not. Using the right-click menu is described later.
To mark items using the DoubleCheck® left-click feature:
- View the return in Enhanced View and select a form.
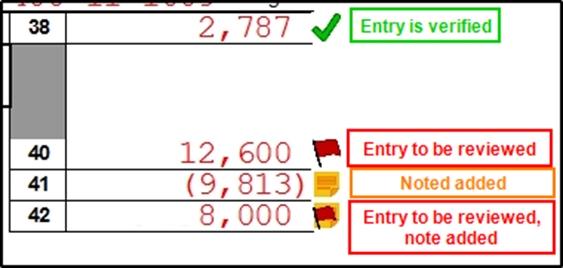
- On the form, move your pointer to any text, check box, or amount field in the document. You see a temporary gray check mark as a tool tip that indicates an unverified entry.

- Left-click the item once to place a green check mark beside it indicating it has been verified. Left-click the item twice to place a red flag beside the item indicating this result needs to be reviewed
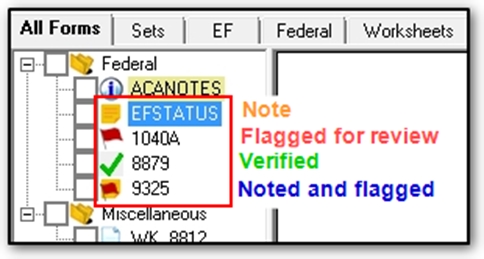
An icon reminder also appears next to the form in the document tree to the left.
When the flagged item has been reviewed and verified, return to the form in Enhanced View mode and click the item once to remove the flag or twice to indicate the entry has been verified.
- If an item is marked as verified and a change in data entry affects this amount, the green check mark becomes a red flag that requires re-verification.
- Add a form note. Point to the upper-left of the form to display a note icon. Left-click the icon to prepare and save a note. (You can also add field notes using the right-click menu, described below.)

Using the DoubleCheck® Right-Click Menu to Mark Fields or Add Notes
To mark items using the DoubleCheck® right-click menu:
- View the return in Enhanced View and select a form.
- On the form, move your pointer to any text, check box, or amount field in the document. You see a temporary gray check mark as a tool tip that indicates an unverified entry.

- Right-click the item. A menu appears. From the menu, select the action you require:
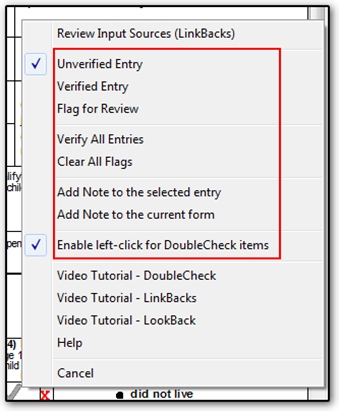
- Unverified Entry removes a check mark or flag.
- Verified Entry places a green check mark beside that item.
- Flag for Review places a red flag beside that item.
- Verify All Entries places green check marks beside every box or field on the form containing entries.
- Clear All Flags removes all green check marks and red flags from the form.
- Add Note to the selected entry - This becomes Edit Note for the current entry if a note already exists.
- Add Note to the current form - This becomes Edit Note for the current form if a note already exists.
- Enable left-click for DoubleCheck items - This enables or disables left-click for DoubleCheck. In the example above, left-click is enabled.
Note: If you have enabled printing of the W-2/1099 forms and wish to use DoubleCheck® to verify the form(s) in view, also check the box Print two W-2/1099-Rs per page under Setup > Options.
To add notes using the DoubleCheck® right-click menu:
Select Add Note to selected entry to insert a note about the item. Select Add Note to the current form to add a note to the form.
A Note Editor window appears. Enter any note needed and click Save at the bottom of the window. A yellow note icon appears next to the item or, for a form note, in the upper-left corner of the form. Any green check mark or red flag you may have set for an item appears on top of the note icon for that item (but the temporary gray tool tip check mark does not).
The text of the note is visible only when you edit it and cannot be printed.
You can edit or remove a note. To edit a note, right-click on the icon and select Edit note for the selected entry. Make any changes and click Save. To remove a note, click Remove Note and confirm at the prompt.
See DoubleCheck for a video demonstration of the DoubleCheck® functions.