Drake Documents - Working Cabinet
Article #: 20073
Last Updated: October 16, 2025

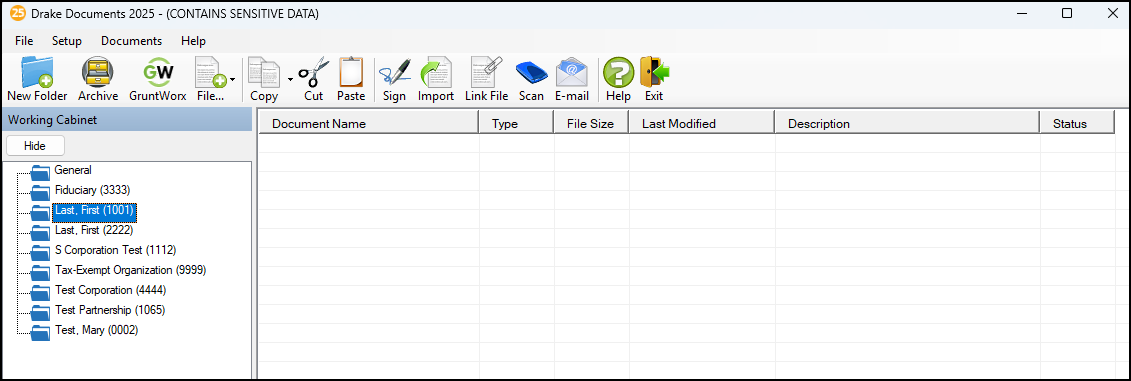
The Working Cabinet window in the DDM consists of the folder “tree” on the left side, a list of files contained within a selected folder on the right, and a menu bar and toolbar at the top.

Part of the Drake Documents Interface
Folders are listed alphabetically, on the left side of the window, based on the individual clients’ last names or the business clients’ first names. Subfolders are stored within each client’s folder. Click the Plus Sign to expand a portion of the tree; click the Minus Sign [-] to collapse it; or, with a folder selected, press the Plus Sign [+] or the Minus Sign [-] on the numbers pad of your keyboard.
Other keyboard options include pressing:
-
F1 for Program Help for the selected cabinet (Working or Archive)
-
F4 to rename a selected folder
-
F6 to rename a selected document
-
F7 to copy a selected document
-
F8 to open the email function
-
F10 to open the client’s folder in the DT folder of Drake Tax
Navigating the Working Cabinet
Click to open a folder (or subfolder) and in the Document pane, Drake Documents displays the documents in the folder, listing them by document names, types, dates modified, descriptions, and statuses. Click the column headers to sort by columns.
Like other Drake Tax windows, the Drake Documents window has a menu bar and a toolbar. If a keyboard shortcut exists for a menu item, it is listed to the right of the menu item. You can also access many toolbar selections from the menu bar. Each toolbar button activates a different function.
Sending Files to Archive Cabinet
To send the documents saved during the 2025 tax season from the Working Cabinet to the Archive Cabinet, take the following steps:
-
From the Working cabinet toolbar, select Archive to open the Drake Documents Archive Utility window.
-
Select the boxes to the left of the client folders you wish to archive (or click Select All).
-
Click OK.
-
When the process is complete, click Close.
Adding Documents
To upload a document to a client’s folder, navigate to Documents in the toolbar and click Add Document. To create a new document, go to the File icon and choose an option from the drop list. Documents can be copied, scanned, and signed directly within the DDM.
Importing a File
Import a PDF copy or scanned image from another program located elsewhere in your computer or network into a client’s Drake Documents folder. To import a file into Drake Documents:
-
Select the folder where the document will be stored.
-
From the toolbar, click Import to open the Import File dialog box.
-
Browse to and select the desired document.
-
Click Open. Drake Documents copies the document into the selected folder.
Scanning a File
Scan documents into Drake Documents using a flat-bed or document-feed scanner. A flat-bed scanner scans one page at a time, creating a separate PDF document for each page. A document-feed scanners are quicker and more versatile, scanning multiple items and making one document of many pages.
When you scan a document using Drake Documents, the program automatically locates and uses your system’s default scanner. A Scanner Cannot be Located message implies that the scanner is not TWAIN compliant or has been improperly installed.
To scan a document into Drake Documents:
-
From the Drake Documents toolbar, click Scan.
-
From the Scan Input dialog box, type in a name for the scanned document or choose one of the common document names previously entered and select a file.
-
Select Use Scanner Bed or Use Document Feeder.
-
(optional) Click Add name to common documents list as desired.
-
(optional) Select Enable duplex scanning if available (if appropriate and if that option exists).
-
Click Scan.
To ease search and retrieval of Drake Documents files, use a consistent naming convention. The Common Documents feature can help you to do this.
Many TWAIN-compliant scanners work with Drake Documents. Always review scanner specifications before purchasing a scanner.
Linking a File
Create a link between a Drake Documents file and a document outside Drake Documents. Drake Documents maintains the link to the external document so that if the document is updated, the link remains and you do not have to replace the document in Drake Documents.
To create a link to a file in Drake Documents:
-
Select a folder in which to store the link.
-
Click Link File from the Drake Documents toolbar.
-
Browse to and select the document to be linked and click Open. The link is indicated in the Type column of Drake Documents. Double-click the line in the document pane to open and review the linked file.
See Drake Documents - Archive Cabinet for more information about the Archive Cabinet.