Drake Tax - Right-Click Menus in Drake Software
Article #: 12615
Last Updated: November 07, 2025

From a Data Entry Screen
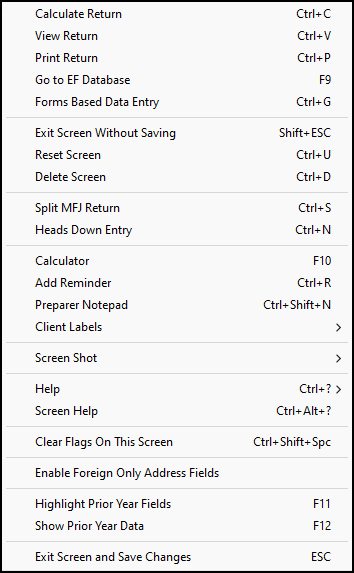
The list of options from a data entry screen looks like this

-
Calculate Return - calculates the return and displays the Calculation Results window. The Summary tab displays important information about the return, including return notes and any EF messages.
-
View Return - takes you directly to view mode of the return.
-
Print Return - takes you directly to print mode of the return.
-
Go to EF Database - takes you to EF > Search EF Database and presents any acknowledgment records in the database for this client.
-
Exit Screen Without Saving - exits the screen without saving any entries made.
-
Reset Screen - removes any entries made currently and leave the screen as you first entered it.
-
Delete Screen - generally allows you to delete an unnecessary screen. Some screens may not be deleted (such screen 1, the Name and Address screen). If more than one screen has been entered, the Existing Forms List is displayed with that item checked. You can then select additional screens or cancel the deletion of the current screen.
-
Split MFJ Return - gives you the option to split the return if it is a married filing jointly return.
-
Heads Down Data Entry - goes to a specific method of data entry that allows you to set which fields are entered and in what order. It is an efficient method of data entry when you are working from an interview sheet.
Note Proformas are not available in Drake Tax 2024. See Drake Tax - Proformas for more information.
-
Calculator - displays a calculator for your use.
-
Add Reminder -displays the NOTE screen, where you can enter notes or other reminders.
-
Preparer Notepad - displays the PAD screen for additional return notes.
-
Client Labels - allows generating client specific mail or folder labels.
-
Screen Shot - allows you to take a picture of the current screen and export it to a file, to the printer, or to the clipboard.
-
Help - provides additional resources for working with the software.
-
Screen Help - provides additional assistance for the current screen.
-
Clear Flags On This Screen - clears any flags set for the current screen.
-
Enable Foreign Only Address Fields - opens up the foreign address fields for your use (simply clicking on them will also open the field(s) for data entry).
-
Exit Screen and Save Changes - exits the screen and saves any changes made.
From The General Tab
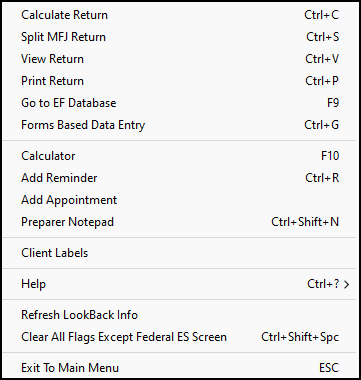
The list of options available from right-clicking on the General tab looks like this:

Many of the options are the same. However, there are a couple of additional options.
-
Add Appointment - allows you to schedule an appointment for this client using the Drake Software Scheduler. The scheduler opens and asks if you want to Autofill demographic data from this return. If you select Yes, the Appointment Detail screen opens to allow you to set up the appointment.
-
Client Labels - displays a window to create a specific label for the current client. Use this window to print a folder label for only this client or other labels, such as the IRS ‘Mail To’ Address label.
-
Clear All Flags Except Federal ES Screen - removes all flags for the return. A confirmation message is displays before the flags are cleared.
-
Exit to Main Menu - takes you back to the Home window of the software.