Drake Tax - Using Miscellaneous (Misc) Codes in the CSM/ PCM or Bill Screen
Article #: 13245
Last Updated: December 05, 2024

The Miscellaneous Codes are optional preparer-defined fields set aside for tracking returns. You may enter letters, numbers or a combination of both to code returns for tracking purposes. You can use these codes to sort returns for reports, mailing labels, client lists, etc. You can manually enter the code each time or create standard codes to choose from a drop down menu.
Watch the video https://support.drakesoftware.com/Video/administrative-options-setup for a demonstration.
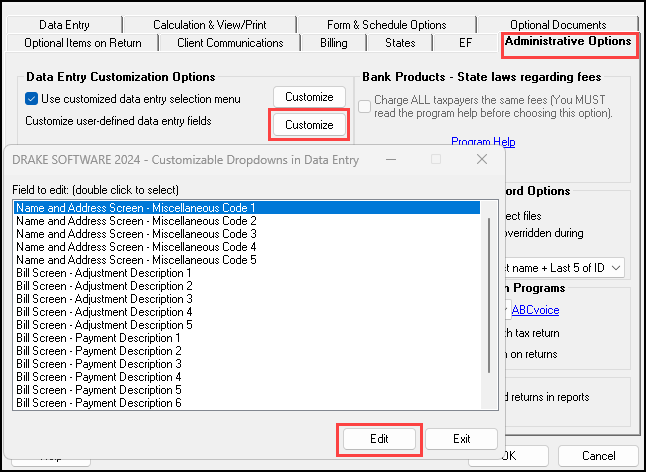
To create standard drop list options, go to Setup > Options > Administrative Options tab > Customize User-Defined data entry fields. For each miscellaneous code 1-5, you can enter the code(s) that you want to have included in the list with a short description of the code. Each Miscellaneous code drop-list is set up separately. These codes can be used on the Name and Address screen and the BILL screen for different drop lists.

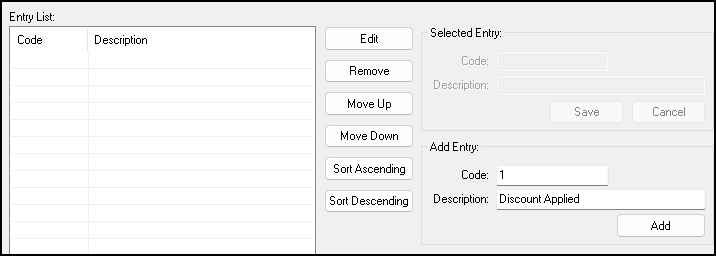
After clicking Edit on the selected code (as above) you will see an Edit Entries window. On the right of this window, entries may be added by:
-
Selecting and entering a unique code,
-
Entering a description, and
-
Clicking Add.

Repeat this process for all desired codes. When you are finished, click Save Changes. Then Exit to the Setup > Options window and click OK to save all option changes.
To choose the code on a return, go to Screen 1 of data entry. On a 1040 return, there is a section with Miscellaneous Codes 1-5. On business and fiduciary returns, there are two available MISC Code fields located in the Other Information section of screen 1.
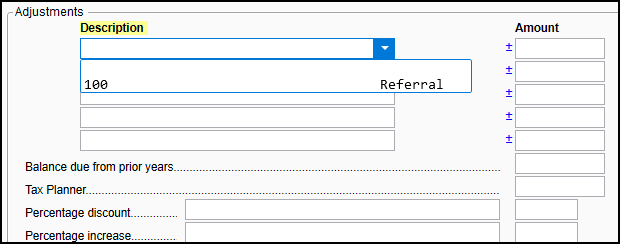
On all return types, after being set up, drop lists can be used on the BILL screen for Adjustment descriptions, Payment descriptions or Percentage Discount/Increase descriptions.

If you have created a customized drop-down list for the codes, the field will appear with a drop-list indicator arrow as below:

Once you have established the codes you need, open the Client Status Manager (CSM) and select the Customize button from the toolbar at the top. From the Available Columns section select the codes you need to appear in your view. Drag the code to the place you wish it to appear in the CSM. When the code is in place in your CSM view, you can click on it to sort by the code column.
You may also customize the Personal Client Manager (PCM) to include the code column needed. Right-click in the PCM and select Customize Display. Highlight the miscellaneous code and select to send it to appear as a column in the current view. Drag it to the place you need it to appear in the column lineup. When it is in place, click on it to sort by that code column.
Updating Codes
To update your custom codes from year to year, use Last Year Data > Update Settings and choose CSM Custom Statuses. This updates the options available in the drop lists detailed above. If used in a prior year on a return, the custom code will be brought forward on a return-by-return basis when the return is updated. It will be filled in when that return is calculated for the first time. Alternatively, you can choose to batch calculate all returns to be able to use these custom statuses for tracking before you have begun data entry. For details on batch calculation, see Drake Tax - Batch Calculation .