Drake Tax - Fixed Asset Manager Reports
Article #: 14266
Last Updated: November 03, 2025

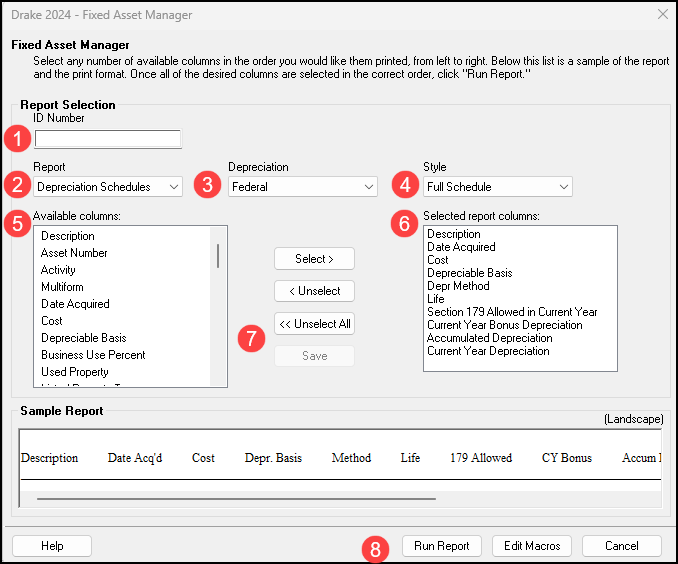
The Fixed Asset Manager allows more customization and detail on fixed asset reports. To access the enhanced Fixed Asset Manager, from the home screen of Drake Tax go to Reports > Fixed Asset Manager.
Important Reports cannot be generated for a client unless the return has first been calculated with asset details entered. If the Fixed Asset Manager shows an unexpected result, recalculate the return, and then run the report again.

-
Enter the ID number for the return for which you want to run the report.
-
Select a Report type:
-
Depreciation Schedules
-
Listings
-
Section 179 Asset List
-
Dispositions
-
Department Summary
-
Year Summary
-
Asset Category Summary
-
Preference Report
-
Auto Code Print (Customized separately - see Building a Set of Standard Reports below)
-
-
Select the Depreciation type being tracked:
-
Federal
-
State
-
Alternative
-
Book
-
-
Select the Style or sorting method for the report:
-
Full Schedule
-
By Department
-
By Form/Schedule (1040 only)
-
By Asset Category
-
-
Select from the list of Available Columns to add to the report. Choose the column header and click Select.
-
Selected columns will show on the right. To remove columns, select from the list and click Unselect.
-
To save the options that you have chosen for this report type, select Save.
-
Click Run Report.
Once the report has been generated, you can either print the report or export it to a CSV file. If you choose the option Export to CSV, a dialog box shows the export or save location. The default location is C:\DrakeYY\Reports\FxAstMgr.csv, if Drake Tax is installed locally. Substitute your network drive letter as needed. You can browse to this location to open the report or move or copy it to a new location.
Reports generated using the Fixed Asset Manager will show in View/Print mode of the return as Fixed Asset Report (FAM_RPT~ in basic View).
Tip If you update asset information in the return and need to refresh the report in View/Print mode, simply run the report again using the steps listed above.
Building a Set of Standard Reports
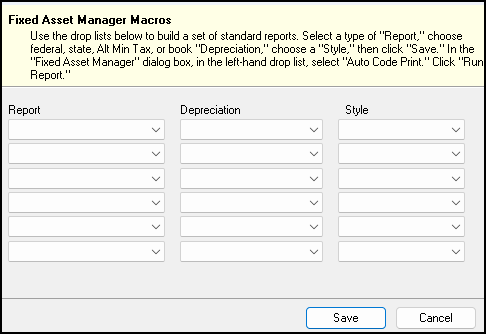
The enhanced Fixed Asset Manager allows for the generation of a set of standard reports to run for clients. This means that you can specify up to six reports to run for each client in a single process. First, you must customize each report that you want to use in the set of reports by following the steps above. Once all of the reports are customized and saved, click Edit Macros at the bottom right of the Fixed Asset Manager window. The Macros for the Fixed Asset Manager window opens:

For each row, select the report, depreciation method, and style that was chosen for each custom report. Select up to six separate reports to run and click Save.
To run the Set of Reports for a client,
-
Go to Reports > Fixed Asset Manager.
-
Enter the ID Number of the client.
-
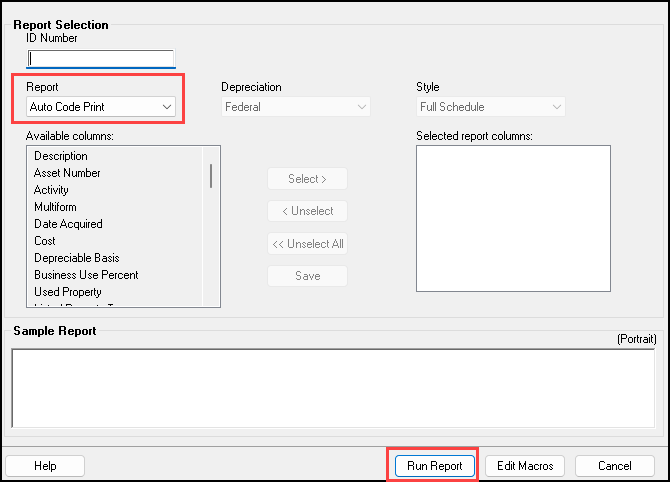
Choose Auto Code Print in the Report drop down. All other choices will be grayed out as the conditions have already been set under the Edit Macros menu (above).
-
Click Run Report.
-
Print, Export to CSV, or Exit the report viewer.
-
The generated Standard Report will now show in View/Print mode of the return as Fixed Asset Report (FAM_RPT~ in basic view).

Report Blank
If the report is blank when you attempt to export it to Excel it may be because there are too many columns on it. Re-run the report and remove any unnecessary columns. The report will say "Potentially too wide" when there are too many columns included:
