Drake Accounting - Setting up an Employee Cash Advance Repayment
Article #: 20063
Last Updated: November 05, 2025

The following steps outline a recommended approach to entering a cash advance repayment as a payroll deduction in DAS.
Unlimited deductions can be set up for the employer. To do so:
-
From the side menu, select Employees > Deductions & Benefits.
-
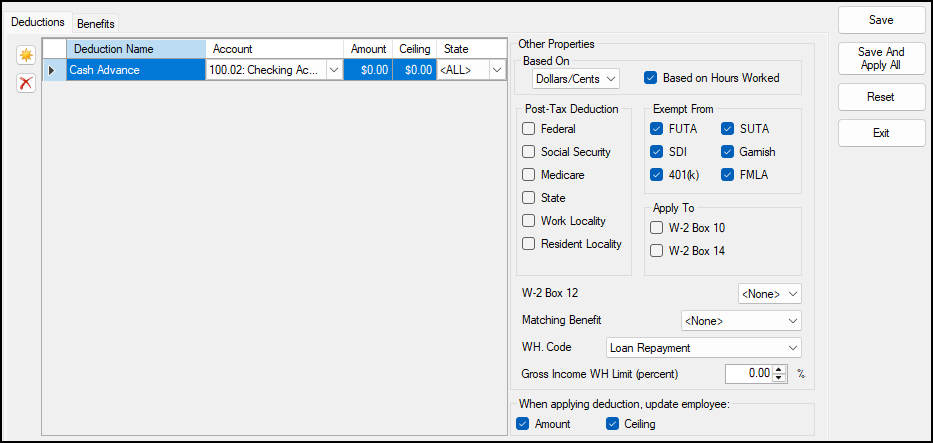
On the Deductions tab, click the New button at the top-left. A blank row is added to the Deductions grid, and the Other Properties section is activated.

-
Complete the following deduction information, as necessary:
-
Deduction Name - Enter Cash Advance as the name of the deduction. This appears as the name of the deduction on the pay stub.
-
Account - (if using the bookkeeping function) Click the drop list to access the postable Chart of Accounts list. The Accounts Receivable account is selected in this example.
-
Amount & Ceiling:
-
Leave both fields at 0 to allow manual entry per paycheck based on the agreed repayment terms.
-
Alternatively, you may set a ceiling amount tied to hours worked if specified in the repayment agreement.
-
-
-
Complete the following information for Other Properties, as necessary:
-
Based On - Select Dollars/Cents or Percent.
-
If Based on Hours Worked is selected, the deduction is calculated by multiplying the Hours Worked (located at Employees > Payroll > Live or ATF) by the deduction Amount.
-
If Based on Hours Worked is not selected, the deduction is calculated by multiplying the total Gross Pay (located at Employees > Payroll > Live or ATF) by the deduction Amount.
-
-
Select appropriate post-tax deduction boxes. Note: Employer cash advance repayments are generally not tax-deductible for the employee because the advance is considered a portion of earned wages, not a loan.
-
As appropriate, mark the deduction as exempt from any applicable tax types.
-
W-2 & WH.Code:
-
This deduction should not apply to any W-2 boxes.
-
Assign a WH Code such as Loan Repayment, which best represents its purpose.
-
-
-
Click Save after entering each deduction. Choose Reset to revert all information for the current deduction to its previously saved state.
Note Clicking Save And Apply All updates the amount and/or ceiling setting for each employee who has the corresponding deduction assigned to them.
-
Add additional deductions as necessary, clicking Exit when finished.
Employee Set Up
-
Go to Employees > Employee Setup.
-
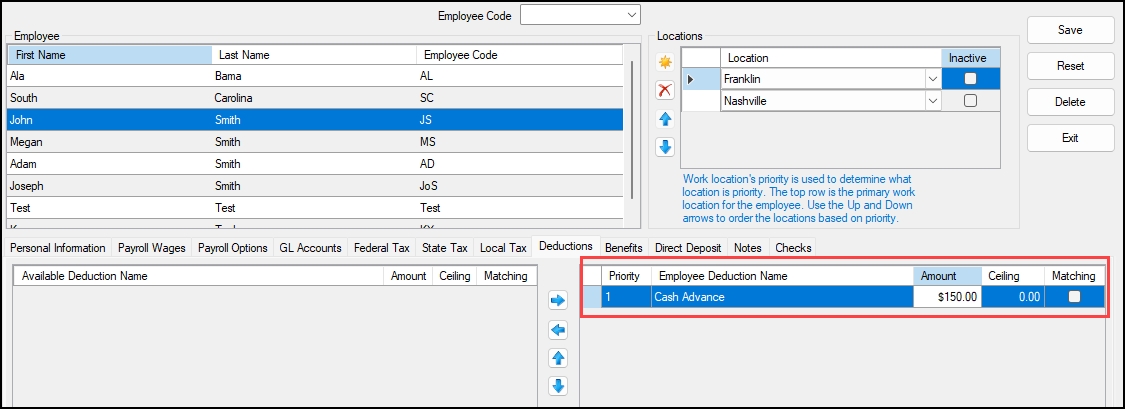
Select the employee for whom to apply deductions, then select the Deductions tab.

-
Select the applicable Available Deduction Name and click the right arrow
 to assign the deduction to the employee. The deduction is displayed as Employee Deduction Name.
-
Double-click the Priority, Amount, or Ceiling to edit the amount for the cash advance.
-
-
Once you add all desired deductions, click Save.
Note To delete a deduction from the employee's list, select the applicable Employee Deduction Name and click the left arrow
 to move it back to Available Deduction Name. Save when finished.
At the bottom-right are check boxes for Amount and Ceiling. If marked, pressing F3 reverts the deduction amount and/or ceiling to the default figure, established at Employees > Deductions & Benefits > Deductions tab.