Drake Tax Online - Setting Up Users and Preparers
Article #: 18795
Last Updated: March 24, 2026

Someone with administrator rights in Drake Hub and Drake Tax Online must follow the steps below to set up a new preparer in Drake Tax Online.
Important These steps must be completed in the correct order to ensure the preparer can log in, see returns, and e-file, when applicable. Skipping or completing steps out of order may result in access or visibility issues.
Verify ERO and Firm Setup
If the preparer will be e-filing returns, confirm that you have completed Setup > ERO Setup and Setup > Firm Setup. This is done inside each year of Drake Tax Online. You can update settings from the prior year, if available.
Note Missing ERO setup can prevent e-file options from appearing, even when the preparer is otherwise set up correctly. You can skip this step if you have already completed setup for other preparers.
Caution In Setup > Firm Setup, make sure that you have checked the box Can prepare business returns, if you plan to create and file business returns. If this is not marked, you will not see those return types when attempting to create a return.
Create the Preparer Profile
Next, create the preparer profile inside Drake Tax Online. To set up preparers, follow these steps:
-
Log in to your Drake Tax Online dashboard and launch the appropriate year of Drake Tax Online.
-
Click Setup, then Preparer Setup from the drop list.
-
Click Create.

-
Enter their details, including a unique e-mail address that they will use to log into Drake Tax Online.
Tip The Username will be used in the next part, so take note of what you have chosen.
-
You can configure other options at this time, including:
-
Enabled – must be marked to allow access.
-
Can E-file – must be marked to allow e-filing.
-
Security Roles – choose which roles they should have as a preparer. This differs from the roles in Drake Hub.
-
Pin Signature – see KB 18930 for details.
-
-
Click Save at the bottom of the screen.
Link the User to the Preparer Profile
Once the preparer information is set up, create and link that preparer as a DTO dashboard user by doing the following:
-
Click Exit 2025 to return to the Drake Tax Online dashboard , then click Manage Accounts.
-
Click New User.
-
Enter the e-mail that te preparer will use to sign in, then click Next.
-
The Edit User screen opens.
-
Use the search box to link the user with the preparer for each year that they need access to. Changes are saved automatically.

Tip The Username that you entered under Setup > Preparers will display here as an option.
If you link the wrong preparer, you can click the trashcan icon to unlink it.
If the preparer is not linked to a user, they may be able to log in but will not see or access returns correctly.
Next, add the user/preparer as a staff member in Drake Hub. To add a new staff member, follow these steps:
-
Log in to Drake Hub.
-
Click Staff on the left.
-
Click Add Staff, above the list of existing staff members.

-
Complete the required fields, including the staff member's First Name, Last Name, Email Address. Be sure to enter the email address that was used earlier..

-
Make sure that Send Onboarding Email is marked or they will not receive the email to finish setting up their login (SSO).
-
Assign Clients (optional but recommended).
-
Click Submit. The new staff member is created and you will see their Staff User Account displayed.
-
In the Application Access section, click Manage Access.

-
Select Drake Tax Online in the drop list.
-
Select either User or Admin for Roles & Permissions they should have (or Select All to allow full access).
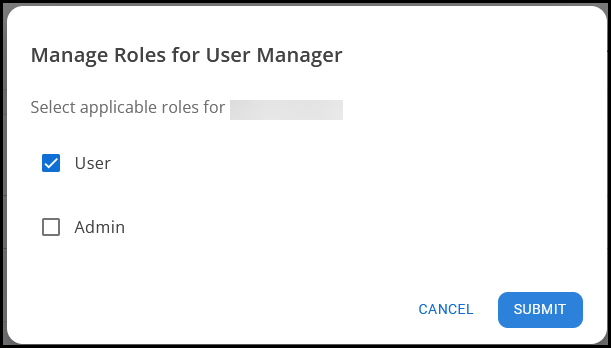
-
Click Submit.
Assign the Preparer to Returns
For a preparer to view or edit a return, they must be assigned to that return. You can assign returns to a preparer on the Workflow tab of Drake Hub or from inside a return on the Taxpayer Information tab.
Note Admin users can see all returns.
Have the User Log In
The user is now set up. Once they finish creating their password for the single sign on (they will follow the steps in the onboarding email), they will be able to log into Drake Hub and launch Drake Tax Online from the list of apps.