Drake Accounting - Post Transactions Process
Article #: 15121
Last Updated: December 05, 2024

The "Post Transactions Process" refers to moving all transactions from all Journals (transaction registers) to the Chart of Accounts (General Ledger).
“Posting” can also refer to moving one or more transactions into a Journal from a module. Checks written for payroll, vendors, payables, or receivables must be entered in an appropriate journal, either manually or by one of the other options available, before they can be posted to the General Ledger. For example, after printing payroll checks, you can:
-
manually post the individual payroll transactions to the journal at Accounting > Transactions, or
-
you can batch post the payroll transactions using the payroll journal button.
The payroll module also can be set up at Employees > Options to auto-post payroll, so that when you have printed the payroll checks an entry will automatically be made to the journal.
To get to the post process, go to Accounting > Transactions > Unposted. Select Post to the right of the screen.

Note You cannot post transactions in the current year if you have not completed the year-end close process in the prior year.
When to Run Post Transactions
Typically, at the end of each month or some other accounting period used during the year. The process must be completed for all accounting periods in the year before you can complete the Year End Close. Most of the Drake Accounting financial reports must be run either before or after the Post Transactions process, depending on the individual report.
What is Posted During Post Transactions
You can select to post transactions for a specific month, date range, or all entered transactions.
How to Post Transactions
Before running the Post Transactions process, be sure that:
-
Transactions are in balance.
-
All transactions have valid account numbers.
To post all Journal transactions to the General Ledger:
-
Go to Accounting > Transactions > Unposted. Click Post.
-
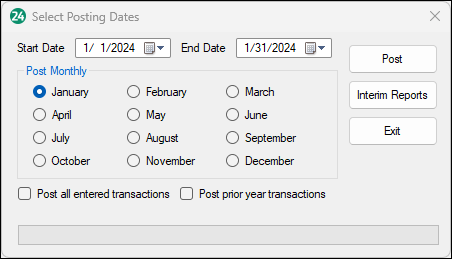
The Select Posting Dates dialog box displays.

-
Select the date to appear on the Interim Reports by either selecting the month or using the drop arrow next to the date field. Selecting a month automatically sets the report date to the last day of the month selected. The date selected does not limit the report to a date range.
-
Depending on your selection, you can either post just the selected month, post all entered transactions, or post prior year transactions to the general journal.
-
Click OK after making a selection.
-
-
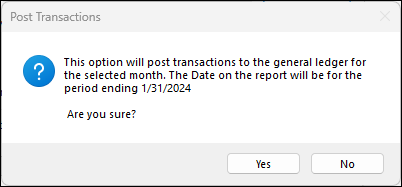
Click Yes to confirm your selection on the next dialog box.

-
Now that the transactions have been posted, you can go through and review the interim reports. To review these, go to Accounting > Reports > Interim Reports. In this window you can select the specific report you want to run for the client.
Note If you do not see any accounts listed under the unposted section drop down, uncheck the option Hide inactive accounts on Firm > User Setup > edit your user ID > Journal Options tab.