

Last Updated:
Article #: 19010
Using Drake SmartExtractTM (Beta), you can upload supported tax documents and import extracted tax data directly into a tax return. This helps streamline data entry by importing information from supported tax forms. This feature uses AI-assisted extraction to help reduce manual data entry from supported tax forms.
Drake SmartExtract (Beta) is available at no additional cost during the beta period for eligible Drake Tax Online users.
Watch the video Drake Tax Online SmartExtract (Beta) for a demonstration.
Note Drake SmartExtract (Beta) is also available for Drake Tax Desktop Users – see Drake Tax – Drake SmartExtract (Beta) for details.
To begin using Drake SmartExtract (Beta), follow these steps:
-
Open an individual (1040) tax return in Drake Tax Online 2025.
-
Click Add documents.

-
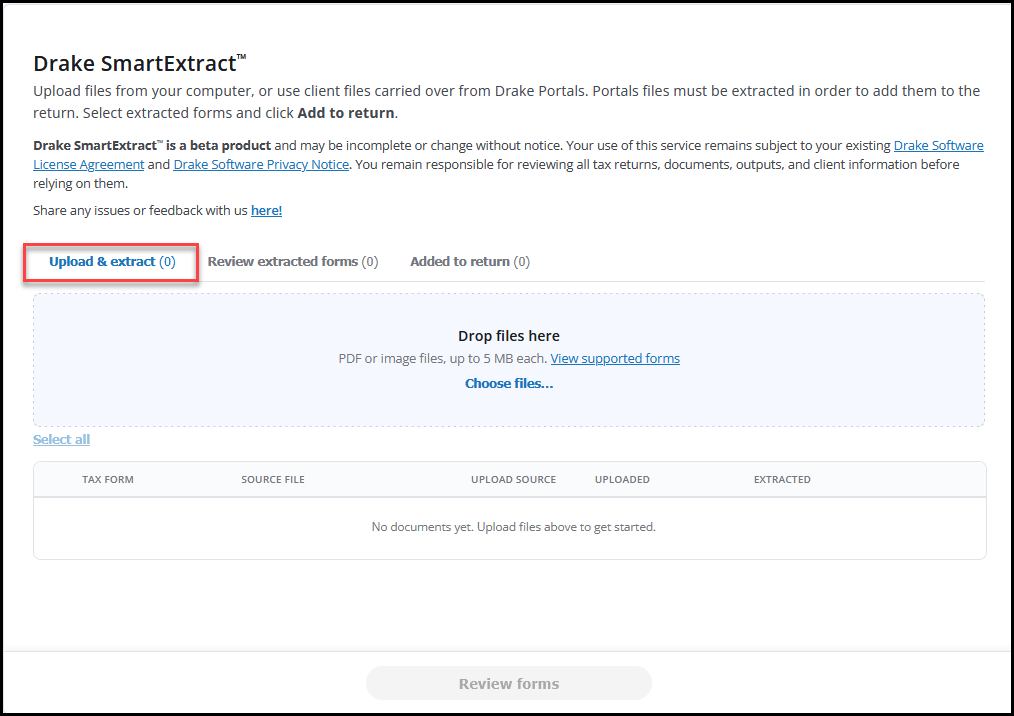
On the Upload & extract tab, upload or select files.
-
Click Choose files and select documents from your computer. Each file will be reviewed and extracted. A progress bar will show to indicate the status.
-
If there are files for this taxpayer in Drake Portals, click Extract all (#) to add them to the form list.
This does not remove files from Drake Portals.
-
Supported file types include PDF and image files, up to 5 MB each. Click the View supported forms link to see a list of forms that are currently supported for extraction.
-
-
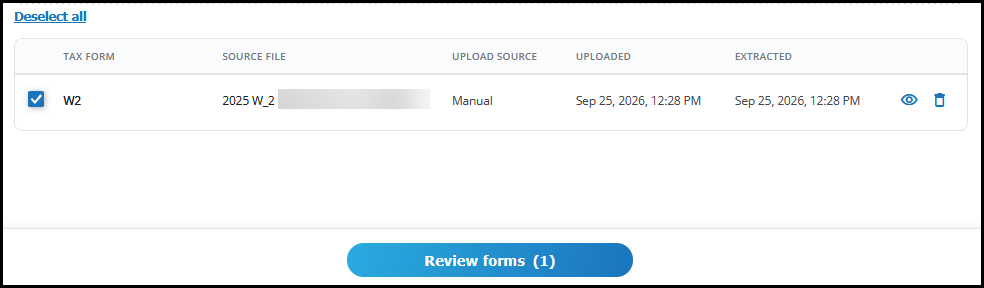
The form list populates with documents that have been extracted (shows files manually uploaded and extracted as well as those that were extracted from Drake Portals).
-
Click the eye icon to preview the file.
-
Click the trashcan icon to delete files from this list, as needed.
-
-
To proceed, select the checkbox beside the tax forms that you want to import, or click Select all, then click Review forms.
-
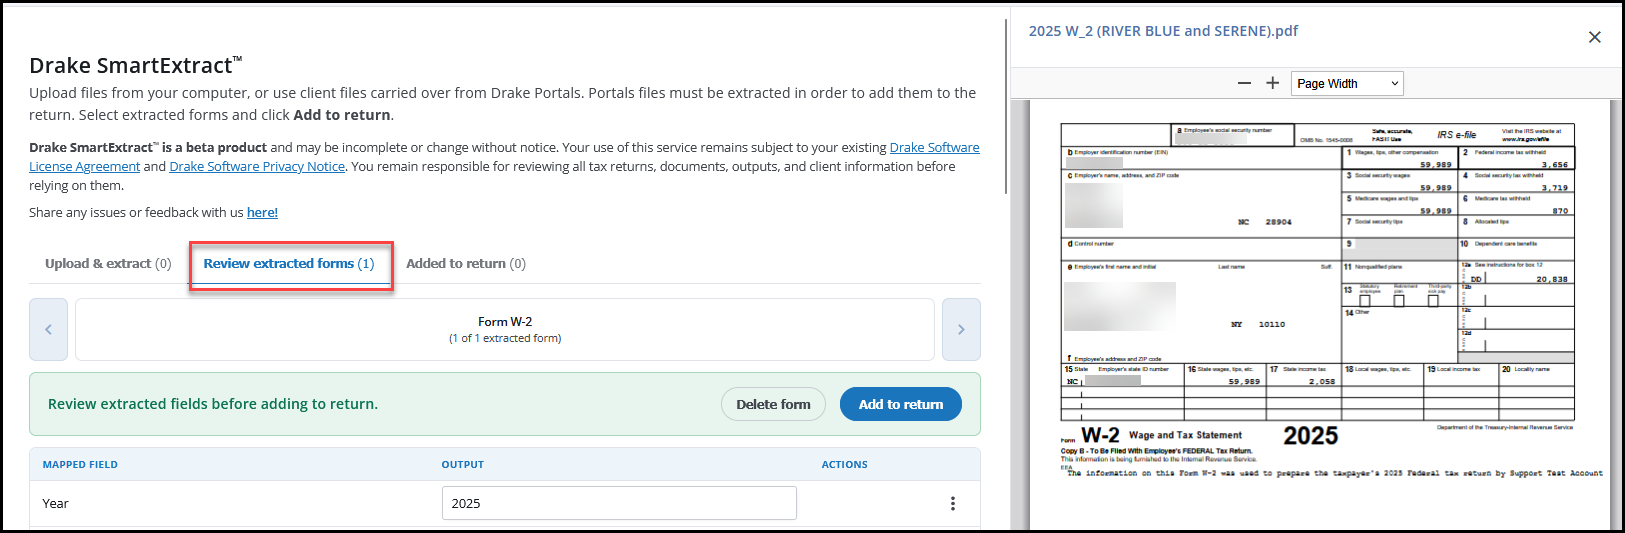
On the Review extracted forms tab, review the tax forms that were extracted. Make changes under the Output column, if needed. When you have finished reviewing, click Add to return.
-
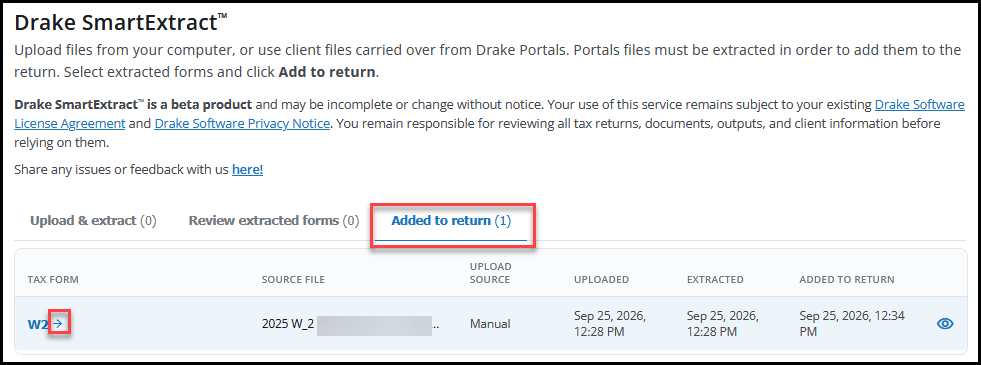
On the Added to return tab, you can see the list of forms that were added. Click the arrow beside the form name to open the corresponding data entry screen.
-
Data entry is displayed on the left, and the original document is displayed on the right. Review them side-by-side to verify the imported data and make any other changes or entries. Some additional selections may be required, such as choosing to whom the form belongs.
Tip You can close the form preview at any time by clicking the X above the document.
-
When you have completed the review, scroll to the bottom of the data entry screen and click Save.
Important Imported data should always be reviewed and verified for accuracy before the return is filed.
Frequently Asked Questions
How can I get support for Drake SmartExtract (Beta)?
Contact our Drake Tax Online team at (828) 349-5727 for assistance.
What is Drake SmartExtract (Beta)?
Drake SmartExtract (Beta) is an AI-assisted tool that extracts information from supported tax source documents and organizes it for use during return preparation.
Are JPG or image files supported for extraction and import?
Yes. You can upload an image of a supported tax form, and the information will be extracted and imported where possible.
What forms and schedules can be imported?
The following forms are supported in this beta release:
-
Form W-2
-
Form 1098
-
Form 1099-INT
-
Form 1099-K
-
Form 1099-MISC
-
Form 1099-NEC
-
Form 1099-R
-
Consolidated Form 1099 (for 1099-DIV, 1099-INT, and 1099-B)
Can I upload multiple documents at once?
Yes. You can upload multiple files in a single operation. Each supported tax form is extracted and added to the return separately.
What file types are supported?
You can upload PDF and image files, including JPEG, JPG, and PNG files. The maximum file size is 5 MB each.
What happens if I upload a form that is not supported?
If the form is not supported, an exception message will be displayed, and the information will not be imported into the return. You must enter that information manually, if applicable.
Can I delete imported forms?
Yes, you can delete or edit imported data, if needed.
Do I have to review the imported data?
Yes. Imported data should always be reviewed and verified for accuracy before the return is filed.
Does the tool automatically file returns?
No. Drake SmartExtract does not file returns. Users should review and verify extracted information before using it in the return preparation process.
Is there any cost to use the beta?
No, the beta is available at no cost during the beta period for eligible Drake Tax Online users.
Is this feature available for 2024 returns?
No. Drake SmartExtract (Beta) is currently available only for 2025 returns in Drake Tax Online.
In what return types can Drake SmartExtract (Beta) be used?
Drake SmartExtract (Beta) is currently available only for 1040 returns.
Future enhancements may expand this capability.