Drake Accounting - Reports Viewer Options- Accounting (DAS22 forward)
Article #: 18585
Last Updated: December 05, 2024

You can view several different reports, such as Balance Sheets, Budget Reports, Chart of Accounts, and Expenses, under Accounting > Reports. Select the report you want to see and click Run Report to open the Report Viewer. From here, you can personalize, adjust, and export the report.
| Icon | Description |
|---|---|
|
|
Use the Thumbnails icon to view the report page by page and quickly navigate to the desired location. |
|
|
Search the text in the document; click the Gear drop list  to restrict the search to case sensitive or whole words. to restrict the search to case sensitive or whole words. |
|
|
View the report in portrait or landscape mode. |

|
Use the Letter drop list to adjust the size of the page to other common formats. |

|
Scale the size of the report. |

|
Grab and move the document. |

|
Click a part of the report to view more closely. |

|
Adjust the viewing pane by zooming in or out in small increments, or manually enter or select the size of the pane using the drop list. |

|
Move to the first, previous, next, or last page of the report, respectively. |

|
Display several pages of the report at once. |

|
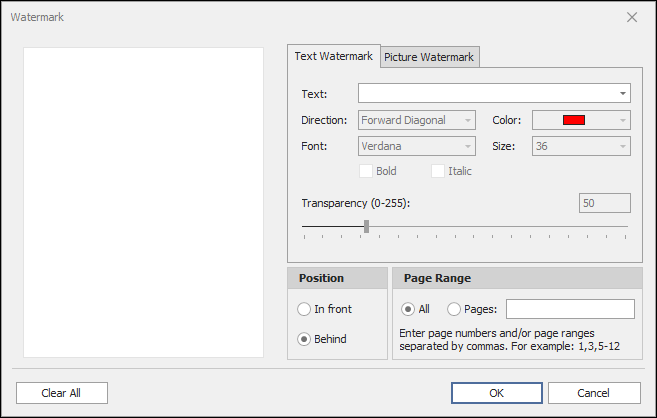
Add a text- or image-based watermark to your report, with additional options for adjusting the positioning, color, transparency, and page range of the watermark. |
|
|
Export the report to a predefined file format, including PDF, HTML, MHT, RTF, DOCX, XLS, XLSX, CSV, text, and image files. |
Watermark
-
To set up a watermark, click the Watermark icon and the watermark window will display.
-
Select Text Watermark or Picture Watermark tab.
-
Complete the information and click Save.

Exporting Reports
To export a report:
-
Click the arrow beside the Export icon and select the desired format.

-
An Export Options window is opened. The available options vary based on the file format selected. Enter any necessary information, adjusting options as needed, options and click Continue.
Note Your most recently selected file format becomes the default for exported reports. Click the Export icon (not the arrow beside it) to automatically use your recent selection.
-
The Windows File Explorer is opened. Choose a location to save the report and click Save.