
Last Updated:
Article #: 13109
Note This article comprises former articles 13320, 14177, 14901, 13124, and 13109. It is herein referred to as KB 13109.
The following sections detail the basics of Drake Tax data entry, including what field colors mean, how to use the special F or ST boxes, and how to use override or adjustment fields.
Data Entry Menu
The Data Entry Menu is displayed when you open a return. It consists of the following components, with the numbers below corresponding to those in the figure below:
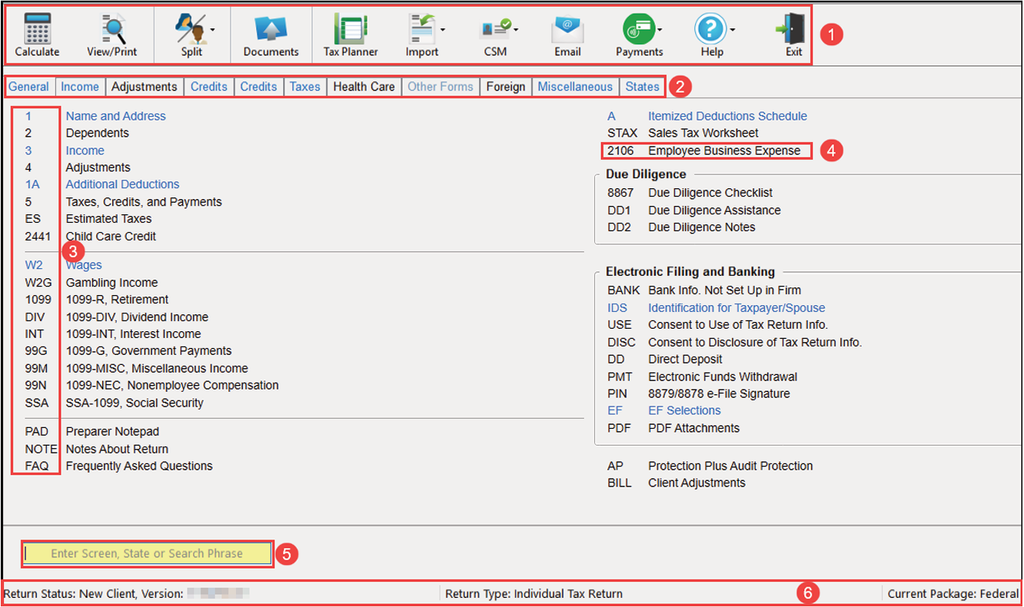
- Toolbar — Perform tasks and access program features.
- Tabs — Access data screens by category.
- Screen Codes — A unique, one-to-four-character code tied to each screen in Drake Tax. Click a screen code to access a screen or type a code into the selector field to search for it.
- Data Entry Screens —Click a screen name or code to open a screen.
- Selector Field — Search for screen names, screen codes, or data entered into screens.
- Status Bar — Lists general information related to the open return.
Normally, to open a data entry screen, you click the screen link (code or name) from the Data Entry Menu, or enter the screen code in the selector field and press Enter. Alternately, use the search function in the Selector field to find the screen you need
Searchable Selector Field
Search for screens by code, name or keyword using the selector field, located at the bottom of all Data Entry Menus.
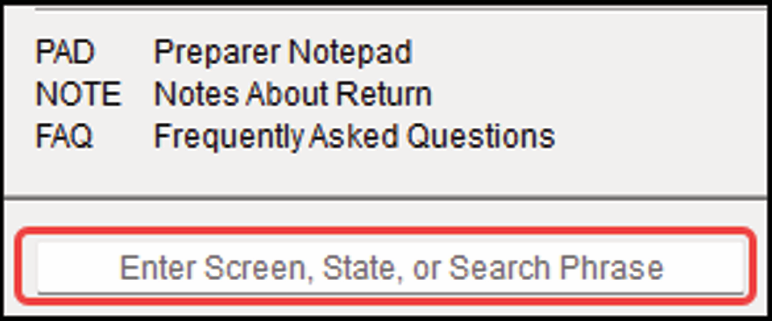
The selector field can find any data—whether that be an amount or a name—entered in a return. If you cannot remember the code or form number or on which tab of the Data Entry Menu the screen is located, search for the screen with keywords or phrases.
For instance, type the code 2 in the selector field, press Enter, and screen 2, Dependents, is opened (or the grid data entry window is opened, if you have that option selected). You can also type in a guess—say, DEP for “dependents”—and press Enter to open screen 2.
If, however, you know there are several other screens that might require entries for dependent children, you can type a keyword such as “Child” in the selector field, press Enter, and a list of screens with the keyword “child” in the heading or within the screen is shown in the Search Results window.
Red and Green Field Backgrounds
A field in data entry shaded (or highlighted) in red generally indicates a detail worksheet has been created for that line item. To examine the items in that detail worksheet, double click on the field or press CTRL + W to open the worksheet.
Each detail worksheet requires a title and a description with a corresponding amount for each line item. When a detail worksheet is created in the federal return, it appears in View/Print mode on a page labeled OVERFLOW. When a detail worksheet is created in a state return, it will appear in View/Print mode on a page labeled XXOVFLOW, where “XX” represents the two-letter state abbreviation.
A field in data entry shaded (or highlighted) in bright green generally indicates that the field has been flagged for review. This is also referred to as an unverified field. See Drake Tax – Flagging and Clearing Flagged Fields for more information on setting up and clearing flagged fields.
Fields may appear in bright green if brought forward from the prior year or if flagged by a conversion program as an item requiring verification.
Red and bright green are system defaults on the Color Selection dialog box (Setup > Colors) shown below. If you customize these selections, the fields may not be highlighted in red or green, but in the color of your choosing.
MFC or “Multi-form code”
The multi-form code box is used to direct income or deductions from one screen or form to another.
For example, a taxpayer is depreciating some assets using Form 4562. The assets being entered belong to the taxpayer’s business. In this return, the taxpayer and spouse have 3 separate businesses reported on Schedule C. Which multi-form code to use is determined by the order in which the Schedule C forms were entered. This is displayed in the Existing Forms List that displays when you go to open a screen with multiple pages.
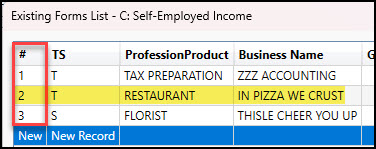
As you can see, the second Schedule C is for the restaurant. Since the restaurant is the second form on the list, use MFC 2 on the 4562 screen.

Important The MFC value restarts at 1 for each screen type. For example, if you have two Schedule C screens, three E screens, two K1P screens, and three K1S screens, the MFC values would be as follows:
| Screen | MFC |
|---|---|
| First Schedule C screen | 1 |
| Second Schedule C screen | 2 |
| First E screen | 1 |
| Second E screen | 2 |
| Third E screen | 3 |
| First K1P screen | 1 |
| Second K1P screen | 2 |
| First K1S screen | 1 |
| Second K1S screen | 2 |
| Third K1S screen | 3 |
When you use the MFC to tie the screens together you choose the screen type in the For box and then the MFC describes which number of that screen type to which it applies.
Schedule E Properties
When you are using the multi-form code with rental properties on Schedule E, the multiform code refers to the property, not the Schedule E. Each property (in other words, each screen) has a separate multi-form code. The MFC number used on the asset screen (for instance, on screen 4562) for a Schedule E should refer to the property (to the screen the property is listed on), not the instance of the Schedule E. (Up to three properties are printed on a Schedule E.)
Note When there are multiple depreciation detail screens and multiple Schedule E properties, the software will generate a Form 4562 for each property.
Schedules K-1
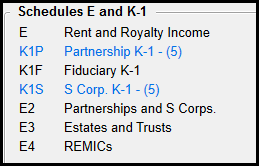
EF Message 1351 generates when you have entered screen K199 with incorrect MFC values. Commonly, this issue occurs because the MFC values have not been set correctly. Each K1 screen type should have a unique MFC set that starts with 1.
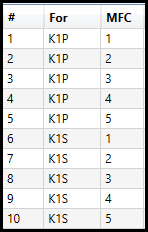
For example there are 10 Schedules K-1 entered in the return on the K1P and K1S screens. The MFC values used on the K199 would be as follows:
| Screen | MFC on K199 screen |
|---|---|
| First K1P screen | 1 |
| Second K1P screen | 2 |
| Third K1P screen | 3 |
| Fourth K1P screen | 4 |
| Fifth K1P screen | 5 |
| First K1S screen | 1 |
| Second K1S screen | 2 |
| Third K1S screen |
3 |
| Fourth K1S screen | 4 |
| Fifth K1S screen | 5 |
If your data entry menu looks like this:
The K199 existing forms list should show the correct correlation where the MFC restarts at 1 for each screen type:
Override or Adjustment Fields
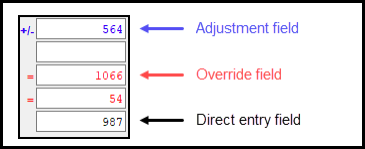
Fields that allow overrides are preceded by a red equal sign (=) and display red text. Data entered in these fields replaces, or overrides, program calculations.
Fields that allow adjustments are preceded by a blue plus/minus sign (+/-) and display blue text by default. Data in these fields adjust program calculations by the amount entered. A positive number increases the calculated amount; a negative number decreases it.
EIN Database
When new employer data is entered on a screen, the program stores the EIN, business name, and business address in the EIN database. The next time the EIN is entered on a W2, 1099, 8283, or 2441 screen, the business’ name and address automatically appear in the required fields.
Bank Name Database
The program retains the names of all financial institutions when they are entered for the first time. The next time the first few letters of a saved name are entered, the program “auto-completes” the entry. To add, edit, or delete entries from the bank name database, place the cursor in a bank name field and press Ctrl+Shift+E and follow the instructions displayed.
Common Screen Fields
Many screens in Drake Tax have fields and drop lists labeled TS, F, ST, or City

These fields and drop lists are used to apply the data on the screen to the taxpayer or the spouse (or both), on federal, state, or city returns.
- TS (or TSJ) — Select T if a screen applies to the primary taxpayer, S if it applies to the spouse, or J if it applies to each spouse equally. (Default is T.)
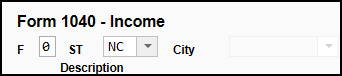
- F — All data on a screen automatically flows to the federal return as applicable. Enter 0 (zero) in the F field to prevent a screen’s data from flowing to the federal return.
- ST — Code indicates whether the screen data should be used in calculating a specific state return. If this field is blank, the program uses the resident state by default. The data does not flow to any state or city if a zero (0) is selected here.
- City — Code indicates the source of the income on city returns.
Press F1 in a field to view all acceptable codes for that field.
Associating One Screen with Another
Drake Tax allows you to associate one screen with another, such as when an asset on one screen should be associated with a specific Schedule C. For example, to associate an asset screen to a C screen, complete the For field and the Multi-form Code field at the top of the asset screen. From the For drop list, select the form to be associated with the open screen.

Note For Schedule E rental properties, each property (in other words, each screen) has a separate multi-form code. The MFC number used on the asset screen (for instance, on screen 4562) for a Schedule E should refer to the property (to the screen the property is listed on), not the instance of the Schedule E. (Up to three properties are printed on a Schedule E.)
“F” Field
The field labeled “F” that appears on some data entry screens can be used to exclude items from the federal return. Entering a “0” in this box will prevent data entered on these screens from appearing on the federal return. This is most commonly used when information needs to flow to state returns, but not to the federal.
For example, 1040 returns that report multi-state Schedules K-1 often require that a separate K-1 screen be created for each state. The information from each K-1 screen may not need to be reported on the federal return – using the “F” box will exclude the information from flowing to the 1040, while still allowing data to flow to the state returns (see Drake Tax – 1040: Multi-State K-1 Entry for more information on this particular example).
ST Field
The ST drop down is used to indicate what state is involved. When you make a selection on this dropdown, the information will be carried to that state return. In some cases, this can generate a state return. You can choose 0 to suppress that screen from being used by any state returns.
Note Some states pull information directly from the federal return, so this may not be applicable in all cases.
State Overrides
If information from the federal return is being carried to the state return, you may need to go into the state data entry screen for that form and choose to suppress the item from being carried to that state. The checkbox wording may vary depending on the form or state involved.
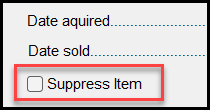
Important This function may not be available for all state forms or screens.
See the following for more information on state returns:
Invalid Character
Limited punctuation is allowed by the Modernized e-File (MeF) system. Only single spaces, hyphens ( – ), and slashes ( / ) are allowed in most fields.
A corporate return allows letters and numbers in the corporate name. The following special characters are also permitted:
-
Pound sign ( # )
-
Ampersand ( & )
-
Apostrophe ( ‘ )
-
Parentheses ( )
-
Hyphen ( – )
-
Blank space
Common punctuation errors include a period ( . ) after street name or P.O. Box as well as a comma ( , ) in the firm’s name. To correct these, calculate the return and double click on the error message (Calculation Results window) to see where the invalid character is located. It may be necessary to retype that field.
In View/Print mode, the MESSAGES page also tells you where the invalid character exists.
ZIP Codes
After you enter the zip code and press Enter, the software fills in the city, state, and resident state. You will need to select the resident city and school district (if applicable).
Note Some ZIP Codes differ within the same city or county, or may be used by multiple counties or locations. When you type in a ZIP Code, Drake Tax uses a ZIP Code database to auto-fill the City, State, and County. This feature uses the first option that is found, whether city or county, obtained from US resources. Generally, this option contains the majority of locations referenced by the code. If the taxpayer’s address is actually in another county, you can change this by letting the information auto-fill and then editing the City or County field.
Screen Capture
Screen captures can be taken in data entry and sent to the clipboard, a printer, or a file. To capture a data entry screen:
- Right-click any open part of the screen (not within a field or text box).
- Select Screen Shot. The program offers three choices for captures:
- To File — Save the screen as a bitmap (.bmp) file to a location you select.
- To Printer — Open the Print dialog box and print an image of the screen.
- To Clipboard — Copy an image of the screen to your clipboard in order to paste it into another program, such as Microsoft Outlook.
- Save, print, or copy the image as directed, according to your selection.
Calculator
A calculator feature is available in every numeric field in data entry. To access it, click inside the field then press F10. Once results are calculated, press F1 to insert those results into the field.
Macros
Macros are shortcuts that allow you to enter frequently used tems with minimal keystrokes.
Heads-Down Data Entry
Heads-down data entry provides an efficient method of data entry when working from a proforma interview sheet.
Combine the organizer codes and heads-down mode to move to the proper areas of a screen for data entry. To work in heads-down mode:
- Open a screen in data entry.
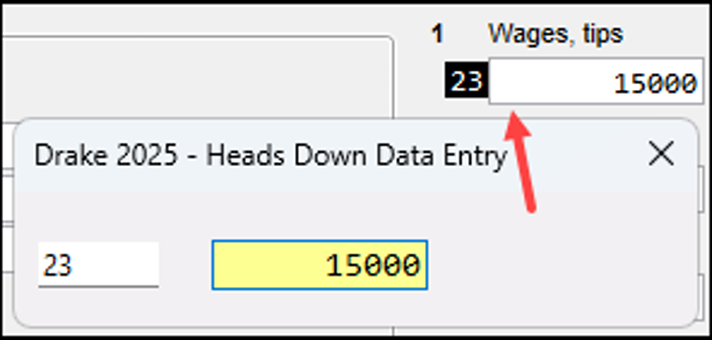
- Press Ctrl+N. Numbers appear in black squares beside each field.
- In the Heads Down Mode box at the top of the screen, enter a field number in the first text box and press Enter.
- Enter data for the field in the second text box and press Enter. The data is placed in the proper field, and the system returns you to the first text box.
- Repeat for all other fields, pressing Enter after the data for each field is entered.
- To return to the Data Entry Menu, press Esc