

Last Updated:
Article #: 15165
Parts I, II, and III
Use the QDT screen to enter data for Parts I, II, and III of Form 706-QDT. Use the top half of the screen for Part I, General Information. Use the check boxes and other fields in the Part II Elections section (at the lower of the screen) to complete Part II, Elections by the Trustee/Designated Filer. Use the fields in the Part III Tax Computation Override section (above Part II) to complete Part III, Tax Computation.
When no name is entered in the Name of designated filer field on screen QDT, Schedule A is generated with Form 706-QDT; when a name is entered in that field, Schedule B is generated.
How to generate both Schedule A, pages 1 and 2, and Schedule B, pages 3 and 4, on a 706-QDT return
Generally, on 706 returns the preparer is either the trustee of the trust, or the person filing the form for someone who is a beneficiary of one or multiple trusts. In some cases, the same person would be both the trustee, and the person filing the form for a beneficiary. When this occurs, Schedule A and B are both required.
In order to generate both Schedule A and B for a 706, clients will need to use the archive feature in Drake Tax, which is outlined below.
To generate both Schedule A and B:
- Create the 706 return with Schedule A completed.
- If you already have a 1040 for the same SSN, see Drake Tax – 706/1040: Using The Same SSN on Both Returns for details on having both 706 and 1040 for the same SSN.
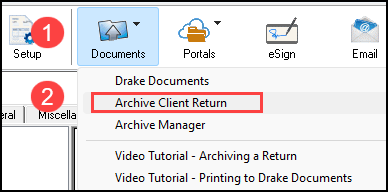
- View the return and click the blue folder icon at the top of the page that states Documents and then select Archive Client Return. (See https://support.drakesoftware.com/Video/archiving-return for a video demonstration.)
- Next enter a description for the return you are about to archive and press OK.
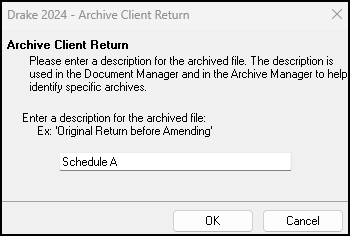
- Note: Since Schedule A has already been created, title this archive Schedule A so you can easily distinguish which archive has Schedule A, and which has Schedule B.
- Once the archive is created, you will receive a popup that states Archive Created Successfully and you can click OK.
- Since the 706 cannot be e-filed, you will need to print out form 706, Schedule A while still in View/Print mode.
- Once you have successfully created the archive, as well as printed Schedule A, go back into data entry for the 706 return, delete the Schedule A, and make the necessary entries to complete Schedule B.
- When Schedule B has been created, view the return, and complete steps 2 through 5 as listed above for Schedule B instead of A.
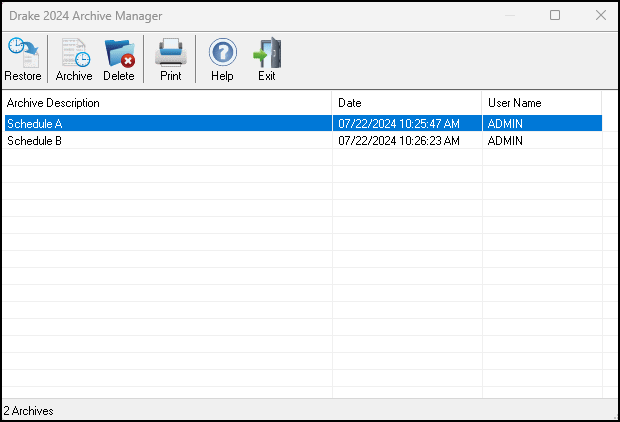
- You should now be able to click the Documents icon at the top and then select Archive Manager, which will display both archives that have been created and have both Schedule A and B for the 706.
- Assemble the signed and completed 706 return with both schedules and mail it to:
Department of Treasury
Internal Revenue Service Center
Kansas City, MO 64999