

Last Updated:
Article #: 15883
Overview
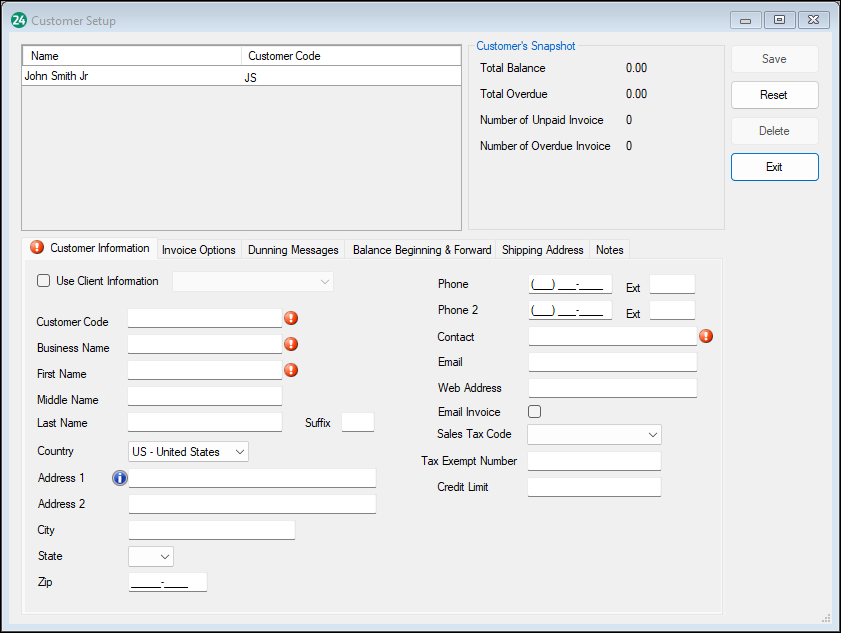
To setup customers, go to Receivables > Customer Setup.
There are no limits on the number of customers that can be set up per client. The Customer Setup window is designed to allow new customer information to be easily entered and provide information at a glance for existing customers.
-
The Customer Setup window shows current customers in the top left portion of the window.
-
When a customer is selected, the Customer Snapshot section will populate with information relating to that client.
-
A blue hyperlink to View Unpaid Invoices will display, if applicable.
-
-
The Customer Information tab contains customer demographics and other setup items specific to the active client.
-
When setting up a new client, items with
 are required.
-
-
The Invoice Options tab allows you to configure what items will be used on the invoices for this customer.
-
The Dunning Messages tab allows you to setup customized dunning messages for your customers.
-
The Beginning Balance & Forward tab is mainly for tracking invoice balances. You may enter a Beginning Balance Date and Amount Owed. The Balance Forward Aging boxes calculate based on invoice entries.
-
On the Shipping Address tab, you may designate the contact info address or a separate address for shipping.
-
The Notes tab is used for any generic notes regarding the customer.
-
At this time, the entries do not have a print function.
-
-
The active buttons are situational.
-
With no customer selected:
-
New – Create a new customer.
-
Reset - Not accessible.
-
Delete – Not accessible.
-
Exit – Close the window and return to the Client Selector.
-
-
After clicking New:
-
Save – Accessible only after all are cleared.
-
Reset – Discards all unsaved changes and returns to Customer Setup window with no customer selected.
-
Delete – Not Accessible.
-
Exit – Close the window and return to the Client Selector.
-
-
With a previously saved customer selected:
-
Save – Save changes.
-
Reset – Discard all unsaved changes and returns to Customer Setup window with no customer selected.
-
Delete – Delete the selected customer. You will need to confirm this decision.
-
Exit – Close the window and return to the Client Selector.
-
-
Customer Information Tab
-
Go to Receivables > Customer Setup and complete the Customer Information tab:
-
Use Client Information — Check this option to fill out applicable fields based on information that has been entered in Client Setup. Use the drop list to select the client.
-
Customer Code — Enter a code for the customer.
-
Customer Name/First Name and Last Name (required) — Enter the customer’s company name in the Name fields, their first and last name, or both.
-
Address 1 (required) — Enter the customer’s billing address. Their shipping address can be entered on the Shipping Address tab.
-
Zip (required) — Enter the customer’s zip code. This field is formatted after information is typed. The City and State fields autofill with information from the zip code database.
-
Phone (optional) — Enter the phone number for the customer.
-
Contact (optional) — Enter the name of the customer’s contact person.
-
Email (optional) — Enter the email for the customer.
-
Web Address (optional) — Enter the web address for the customer if applicable.
-
Email Invoice — Check this option for a button on the Invoices screen to email the invoice. Settings must be set up under Firm > Email Setup to use this feature. See Drake Accounting – Email Setup and Functionality for more information.
-
Sales Tax Code (optional) — Select the appropriate sales tax code for this customer using the drop menu. Sales tax codes are set up on the Receivables > Sales Tax Setup screen.
-
Tax Exempt Number (optional) — Enter the customer’s sales tax exempt number, if they have one. This number prints on invoices and monthly statements.
-
Credit Limit (optional) — The Credit Limit is the maximum dollar amount of outstanding receivables the customer is allowed at one time.
-
Invoice Options Tab
-
Account Type — Select the Account Type as it applies to customer credit.
-
Regular & Temporary types do not track aging balances. Both imply the customer is not operating “on credit” (does not have a credit account). The intent of Regular is to indicate regularly active customers without credit and Temporary indicates those customers who do not regularly place orders.
-
Balance Forward — A balance forward customer is one that is entered into Drake Accounting with an outstanding balance. If selected, the aging balances on the Beginning Balance & Forward tab are activated to track the credit and aging balances for the customer.
-
-
Invoice Type — Select an invoice type. Professional Invoice is the default type of invoice and is the type used when no Invoice Type is selected for the customer. Select a different type of invoice for the customer if the Professional Invoice is not appropriate for this customer. Select either Product, Service, or Professional. A different invoice type can be selected when an invoice is entered for the customer. Also, the invoice type can be used as a filter when selecting invoices to print.
-
Terms — Select the payment terms for this customer. Options in the drop menu are set up on the Receivables > Options > Payment Terms screen.
-
Discount Percent — Enter the Discount Percent (a decimal value less than 1.00) to designate the percentage of discount to be applied to this customer’s invoices. This discount can be used instead of or in addition to quantity discounts. (.25 = 25% discount).
-
Price Code — Select a Price Code based on what has been set up in the Invoice Item Setup screen. See Drake Accounting – Invoice Item Setup for more information.
-
Service Charge — If using a service charge, select the service charge Code and amount from the drop menu. Service charge codes and amounts are set up on the Receivables > Options, Charges Setup tab.
-
Status — Set the Status to be displayed when entering an invoice for this customer. Valid statuses are: Active — This is the status for regular customers and no message displays. The other statuses are: Warning, Hold, Inactive, Notify, and None. When a customer is selected on the Receivables > Invoices screen, this status along with the message that was associated with this status on the Receivables > Options, Customer Status tab is displayed.
-
Ship Via — Enter the preferred method of shipping to this customer. If entered, this is the default method used on each invoice for this customer.
-
Salesperson — If a salesperson is assigned to the customer, select the sales person from the drop menu. Employees set up under Employees > Employee Setup are in the list. Click the Show Vendors check box to include vendors set up under Payables > Vendor Setup in the Salesperson drop menu.
-
Division — Select the division of which the customer is a member. Divisions are set up in Client > Edit > Divisions.