Drake Accounting - Payables - Batch Payments
Article #: 17306
Last Updated: December 05, 2024

Pay off multiple Payables invoice balances with one payment. This will pay off the remaining invoice balances versus paying a little off on each one. An example of when this may be used is if you want a single check with multiple line items for different services or products received from the same vendor. You must select at least one invoice to be included in the batch payment.
To pay off multiple invoices with one payment:
-
Go to Payables > Payments > Batch Payments.
-
In the Vendor data grid, click on the vendor you wish to apply the batch payment to.
-
The only vendors that will show here are ones who have invoices with a balance.
-
-
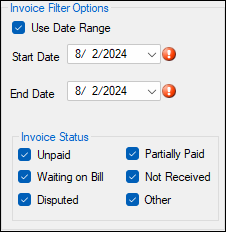
Invoice Filter Options

-
You can filter by invoice date using the Use Date Range option.
-
Enter the Start Date and End Date to pull up invoices for this date range.
-
-
You can filter invoices by using the Invoice Status.
-
Voided or paid invoices will not be shown here.
-
Select a status (or more) as applicable.
-
-
-
Payment Amount
-
This field cannot be edited and populates with the gross totals from invoices that are selected.
-
-
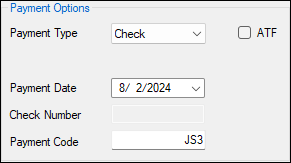
Payment Options

-
Payment Type
-
The Payment Type drop down will default to whatever has been chosen in the Payment Method drop down for that particular vendor under Payables > Options > GL Account Numbers or Payables > Vendor Setup > GL Accounts.
-
You can change the type in the drop down.
-
-
ATF
-
Check this option to made the payment after-the-fact (ATF).
-
ATF is when your client prints the employee or vendor payroll checks and provides you with the transaction data, which you enter into Drake Accounting for bookkeeping purposes.
-
You do not print live checks when doing ATF; you record they have been printed.
-
-
Payment Method
-
This is set up under Financial > Payment Methods.
-
Click the to set up a new payment method, if needed.
-
-
Payment Date
-
Select the date for the batch payment.
-
-
Check Number
-
This field is available when the Payment Type is Check and ATF is selected.
-
-
Payment Code
-
This must be unique for each payment created.
-
When you edit or create a payment, it has to have a Payment Code to either pull up an existing payment or create a new one.
-
This can include letters, numbers, and symbols.
-
-
-
Direct Deposit
-
The firm and the vendor must be set up for direct deposit to use this feature, and Payment Type must be Check.
-
Checking this option will have the payment (check) show in the Transmit Direct Deposit screen.
-
If you haven't checked Suppress Check Stub Printing for Direct Deposit under (Payables > Options), you will need to print the checks under Payables > Check Print.
-
-
Withholding
-
These fields cannot be edited and populate with the gross totals of federal withholding, state withholding, any additional withholding, and the net amount.
-
Withholding must be set up (Payables > Vendor Setup > Withholding tab) to see these fields.
-
-
Invoices tab
-
Select the blank box to the left of the invoice to select it. You can select as many as needed.
-
-
Accounting Transactions tab
-
Once you select an invoice on the Invoices tab, ensure transaction information on the Accounting Transactions tab is as it should be listed in the transaction journal.
-
-
When all of the invoices that you wish to apply the payment to are selected, click Save.
-
To view the payment that you made, go to Payables > Payments > Invoice Payments.