Drake Portals - Website - Guest Exchange
Article #: 13760
Last Updated: April 28, 2026

The Guest Exchange is a panel that shows up on your Drake Portals login page, which clients can use to upload files to you or as an alternate method to download guest exchange files from you.

Before you can use Guest Exchange, you must turn it on to make it accessible to you and to your clients. You can view and change these settings in the Drake Portals website (continue below) or through the Drake Tax integration.
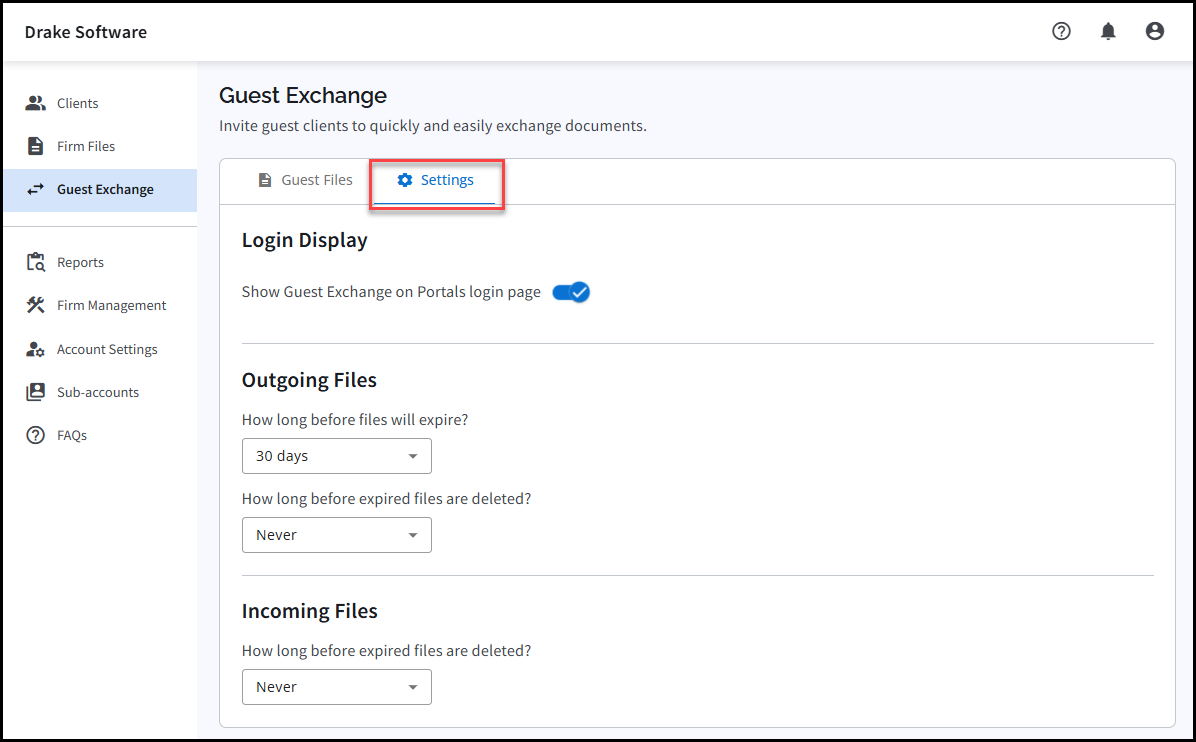
Settings
-
Sign in to Drake Portals.
-
Click Guest Exchange on the left.
-
On the Guest Files tab, outgoing and incoming files will be displayed in a searchable fashion. Apply filters or sort by clicking on the column headers.
-
Click on the Settings tab to access the guest exchange settings menu.
-
From here you can select Show Guest Exchange on Portals login page page to allow access to your clients.
-
You may also set options for Outgoing Files and Incoming Files to determine how long those files will be kept automatically by Drake Portals. These settings are independent of those that apply to your client accounts and are just for the Guest Exchange.
-
Outgoing Files
In order to upload a new file to a guest, follow the steps below:
-
Log into Drake Portals.
-
Click Guest Exchange on the left.
-
Toggle the option To Guests.
-
Click Send Files.

-
In the New Exchange window, enter the following items:
-
Recipient(s) Email Address
-
Send a file to multiple recipients by entering multiple email addresses separated by semicolons. The same file or files and the same message are sent to all recipients, and the same four digits are used by the recipients to download the files.
-
-
Recipient Name
-
Create PIN - last four digits of the SSN/EIN or create a unique PIN.
-
Additional Message (optional)
-
Select File(s) to Upload - Click Select and browse to the file(s) to be uploaded. Multiple files can be uploaded at one time.
-
The Expiration Date for the file defaults to the global Guest Exchange settings, but the field can be changed here to any future date.

-
-
Click Send.
-
Once uploaded, the file will appear in the To Guests section.
-
By default, outgoing files (those uploaded by the preparer) expire 30 days after upload. However, you can also change this setting to 2 days, 7 days, 14 days, 30 days or 60 days. A client can download them any time before they expire.
-
To adjust the expiration date once a file has been uploaded, click on the file in the To Guests list and select Edit Expiration.
-
After selecting the file, you can also click Delete or Resend Notification. Resend Notification sends another email to let the client know that the files have been uploaded.

If the client is unable to download the file through the email link (for example, the link doesn't work or the email was not delivered), select the file to view details. The Download Code can be supplied to the client so they can use the Guest Exchange panel of your SFP Portal login page instead. Only the Download Code is necessary to download the file.
Incoming Files
By default, the incoming file deletion date is set to "Never". However, you can also change this setting to 2 days, 7 days, 14 days, 30 days or 60 days. To modify this setting, simply select the desired date from the Incoming File Settings which can be found under the Guest Exchange Settings.
If the file has not been downloaded, the Downloaded by column will be empty. Once the file has been downloaded, the download date will display in the Downloaded by column. To download the file, click on the three dots in the Actions column and select Download File.

See Guest Exchange for a video demonstration of the Drake Portals Guest Exchange function.