Drake Portals - Settings and FAQs
Article #: 16379
Last Updated: December 08, 2025

Drake Portal settings and reports are available on the Drake Portals website. The gear icon and menu option SFP Settings in Drake Documents redirects to the Drake Portals website, allowing you to modify your settings online. See the sections below for details.
For a video tutorial of some of these options, see Account Settings (for Firm)
Tip See Drake Hub - Settings for options related to Drake Portals and Drake Workflow (Beta) through Drake Hub.
-
When you make a purchase on the Drake Software website, we use Secure Sockets Layer (SSL) encryption technology to safeguard your credit card information while it is being sent to us. The SSL encryption is designed to make the information unreadable by anyone but us. This security measure is working when you see either the symbol of an unbroken key or closed lock (depending on your browser) on the bottom of your browser window.
-
All data collected through our website is protected by a secure server. In addition, we use SSL to secure the transmission of data from the internet to our systems.
-
All data is maintained and backed-up on a regular schedule to provide adequate redundancy and ensure that the integrity of information is never jeopardized.
-
We make every commercially reasonable effort to be fully compliant with rules under sections 6713 and 7216 of the Internal Revenue Code.
-
The complete Privacy Policy and Service Agreements are available in your Drake Portals (SFP) website at the top right by clicking on your username > Account Settings. Information regarding security measures is listed in the Privacy Policy.
-
Recover Username or Password
Employees will use their Drake User manager single sign on account to login after clicking the Employee Sign in link. If they have forgotten those user credentials, see Drake User Manager - Password Recovery and Expiration.
A Drake Portals user can recover a forgotten username or password if a current email has been entered in the account. Your clients recover passwords by following these steps:
-
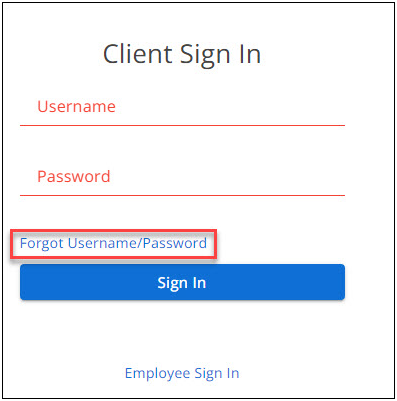
Go to the account login page (the internet address used to log in to the Drake Portals account).
-
Click the Forgot username or password? link.
-
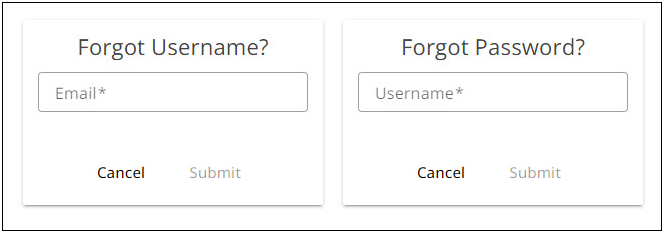
Proceed with either the Forgot Username or Forgot Password:
-
Forgot Username (requires entry of Drake Portals account email address)
-
Forgot Password (requires entry of Drake Portals username)
-
-
Click Submit.
-
They will receive an email with additional steps.
File Types
Word (.doc and .docx), Excel (.xls and .xlsx), and PDF (.pdf) documents and image files (.jpg, .jpeg, and .png) can be uploaded to Drake Portals. Clients can scan their Forms W-2, 1099, and other tax documents to PDF and upload them to the tax preparer. In addition, clients can take a picture of their source document and upload it through their Drake Portals account for use by their preparer. This functionality allows the preparer to use GruntWorx to extract data from source documents as well.
Capacity
Both the Monthly and Yearly Plans include 5 GB of file transfer space. Additional storage is available for purchase. See the Drake Portals page for pricing details.
Upload Limitations
The only limitation on portal space is the maximum amount of space available to the firm based on the plan and extra transfer space that has been purchased.
If one client excessively uploads files or uploads large files, it is the portal administrator's responsibility to remove any unnecessary files. To manage these files, you can either delete the unneeded files from the individual client's folder within Drake Portals or purchase additional storage.
Note Setting a default File Expiration is a convenient way to remove older client and preparer uploads without having to manually delete each file. For more information, see below.
File Expiration
New Files
You can set a global file expiration period on newly uploaded files in the Clients, Public, or Private folders in Drake Portals. This applies to any file that is uploaded after the expiration setting is changed.
To select a file expiration period, do the following:
-
Click on your username in the top right corner.
-
Select Account Settings.
-
On the Account tab, select the desired time frame for Client Files Expire, Public Files Expire, and Private Files Expire.
-
Available expiration periods are:
-
Never
-
7 days
-
30 days
-
60 days
-
90 days
-
6 months
-
Note
-
Expiration occurs in the early morning on the last day of the period.
-
To complete these folder tasks, a login with Admin access level is required.
-
Changes are saved automatically.
Existing Files
For all files in a folder - set a default expiration date for all existing files in a particular folder. This change can be made for the Clients, Public, Private, and Guest Exchange folders
-
From the main page of Drake Portals, select your username in the top right.
-
Select Firm Management.
-
Click on the File Maintenance tab and locate the Expiring Files section.
-
Choose Clients, Public, Private, or Guest Exchange location in the Set files in drop list.
-
For the selected folder, choose what date the files should be set to expire.
-
Click Set Expiration to save changes.
You can see how much available space you have remaining for your account, go to the Drake Portals website and click on your username > Account Settings > Account tab.
Domain Name Change
An administrator can change the name that appears in your Drake Portals account (domain name) address. The name appears after "https://" in the address field of your Drake Portals URL:
https://yoursitename.securefilepro.com/portal/
Tip The account address also is displayed as a hyperlink in client notification emails sent from Drake Portals to your clients.
To request a change on the Drake Portals Website:
-
Log in to your Drake Portals account as an administrator.
-
In the upper right side of the page, click on your username and then choose Account Settings.
-
On the bottom section of the Account tab, expand the Advanced Settings section.
-
Under the Account Owner section, select the link Domain Name Change.
-
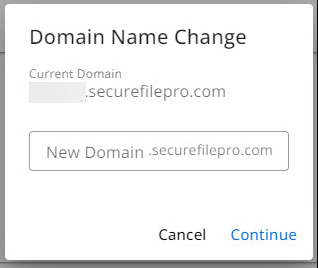
On the Domain Name Change screen, enter the new name.
-
Select Continue.
-
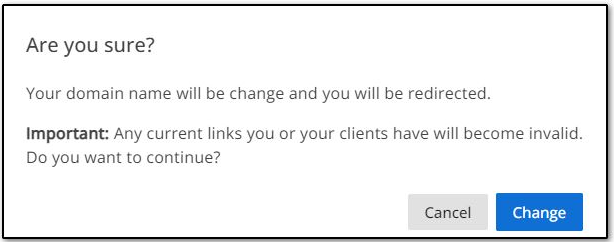
A confirmation box is shown. Click Change to continue.
-
You are logged out and prompted to log in to the new domain with your existing SSO credentials.
Add or Change Logo
The Drake Software logo is displayed by default but can be changed to a custom logo. A login with Admin access level is required.
For a custom logo, prepare a graphic image using these guidelines, and save it to a location where you can find it:
-
Maximum file size: 100 KB
-
Suggested file dimensions: 290 X 75 px
-
Allowed file types: .jpeg, .jpg, .gif, .png
On the Drake Portals website, follow these steps:
-
Click on your username and choose Account Settings.
-
On the Account tab, locate the Firm Name and Logo area on the left, the currently loaded logo image is displayed.
-
Click Change Logo.
-
Browse to the graphic image you want to use, select the image file and click Open.
-
You are returned to the Firm Name and Logo section with the selected image displayed.
-
Changes are saved automatically.
Auto-renew Feature
Once a firm has setup an Drake Portals firm account and entered credit card information, Drake Portals will automatically bill that credit card monthly or annually, depending on the plan selected. You will receive a reminder email informing you of the upcoming auto-withdrawal. Once your card is charged, you will receive a confirmation email receipt showing the amount charged and other renewal information.
If a credit card expires or is declined, the first missed payment results in a delinquent status. The firm, and its clients (taxpayers), can still access all account features and files while the account is in delinquent status.
If a payment is missed while the account is in delinquent status, all firm and client access is shut off and the account is placed in suspended status. An Drake Portals account Admin may still access their web-portal login (sign in) page and make a payment to bring the account back into current status.
If an account is canceled by user request, the account is put into cancel pending status until the next billing cycle. The user still has full access to the account while it is in cancel pending. At the next billing cycle, the account is canceled. The user can log in (sign in) to the account for 30 days after that to renew the account. After another 30 days pass without any payment, the account is deleted, and the domain is recycled.
Upgrade or Downgrade Subscription
To upgrade or downgrade your Drake Portals subscription you will need to log in (sign in) to your Drake Portals website as the Primary Administrator.
-
Select your username in the upper right.
-
Select Account Settings and expand the Advanced Settings section.
-
In the Account Owner section near the bottom, select Change/Update Plan.
-
If you are using the free trial version, an Upgrade Trial is offered before you proceed to the Change Your Subscription screen.
-
On the Update Your account screen, select the desired plan and click Check Out to save the change and proceed to payment.
-
You may select to purchase additional storage space as well.
-
-
On the next screen enter your payment information and select Submit Order.
Note
-
An upgrade is effective immediately and may be prorated. Any pro-ration appears on the emailed receipt.
-
A downgrade is effective at the beginning of the next billing cycle. You are responsible for the full subscription payment for the current billing period. There are no prorated refunds.
Cancel Account
Monthly and annual subscriptions can be canceled at any time in the Account Owner section of your Drake Portals website (Primary Administrator login required). A cancellation notice, once received and verified, suspends the subscription at the end of the current billing period. You are responsible for the full subscription payment for the current billing period. There are no prorated refunds.
If you restore your account before the end of the current billing period, you will not incur any additional charges. If you do not restore your account before the end of the current billing period, your account will be subject to termination.
At termination, your account is completely removed from the system, and Drake Software has no obligation to continue storing or providing access to the documents you have uploaded to your account. Drake Software, at its sole discretion, can decide to recycle your account sub-domain (for example, subdomain.securefilepro.com).
Important If your account is in delinquent or suspended status, you must log in to pay the balance due before canceling.
If an account is canceled by user request, the account is put into cancel pending status until the next billing cycle. The user still has full access to the account while it is in cancel pending. At the next billing cycle, the account is canceled. The user can log in (sign in) to the account for 30 days after that to renew the account. After another 30 days pass without any payment, the account is deleted, and the domain is recycled.
Caution If you have decided to cancel your account, make sure that you turn off the guest exchange and any other features that you do not want taxpayers to have access to after you have submitted the cancellation. Otherwise, all features are available until the end of the billing cycle.
-
Log in to your Drake Portals website as an administrator.
-
Select your username in the upper right.
-
Select Account Settings.
-
Near the bottom of the page, expand the Advanced Settings section.
-
Under Account Owner, click Cancel Subscription.
-
On the Cancel Subscription screen, enter a reason for cancellation and click Yes.
-
After submission, an email notifies you that the cancellation has been received.
-
If you get an internal server error, you may need to clear your browser history.
Re-Activate Account
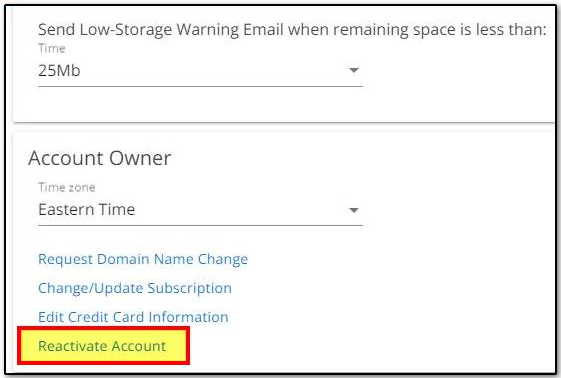
If the request to cancel a subscription was made in error, the account may be re-activated within 30 days of cancellation. To restore your account, log in to your site and select Settings in the upper right. Select Account Settings. Near the bottom of the page, expand the Advanced Settings section. Under Account Owner, click Reactivate Account.
-
Your cancellation request must be received by the last day of the month to be processed by the next billing cycle.
-
For more information, contact Drake Software Support at (828) 524-8020.
Change Credit Card
To change the credit card in the firm account, log in to your Drake Portals account as the Primary Administrator.
-
Click on your username in the upper right and choose Account Settings.
-
Near the bottom of the page, click Advanced Settings.
-
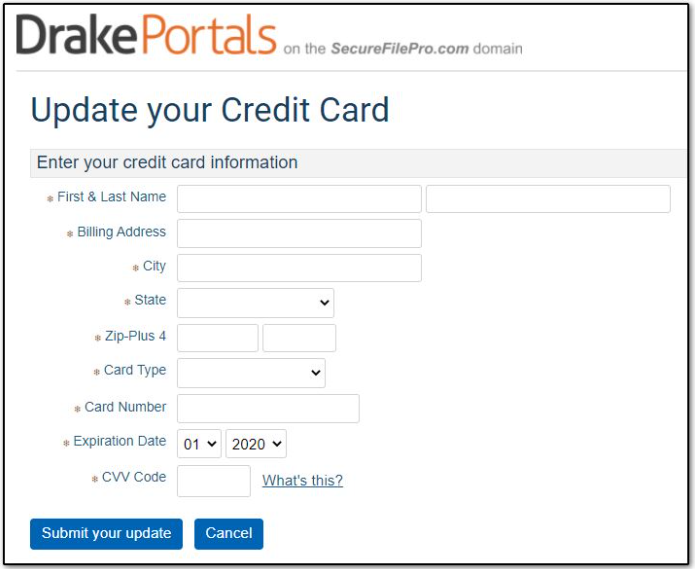
Scroll down and under the Account Owner section select Edit Credit Card Information.
-
Enter the new credit card information and select Submit your update.
Idle or "time out" Period
The website will time out or become locked due to inactivity on the site (not the computer). Users will receive a warning before the automatic sign-out takes place at 30 minutes. This applies to all Drake Portal logins including administrator, preparer, and taxpayer.
Edit Time Zone
-
Log in to your Drake Portals website as the Primary Administrator.
-
Select your username in the upper right.
-
Select Account Settings and expand the Advanced Settings section.
-
Under the Account Owner section, select the appropriate Time Zone in the drop list.
-
Changes are saved automatically.