Drake Portals - Client Profile (1040) and Checklist
Article #: 17698
Last Updated: February 03, 2026

You can upload and download client information through the client profile.
-
The Client Profile section allows you to upload profile data based on prior year information,
-
Then the client can verify or alter the uploaded the profile data,
-
You can then download the data and use it to auto-fill portions of the client’s return.
-
If you have enabled the Client Profile, even if you have not uploaded any data from the return, the taxpayer is able to enter or update their information. This information is not brought back into the return until the process is initiated by the preparer-- see full process below. To disable the client profile, go to your Drake Portal preparer portal > Menu > Account Settings > Connect Features tab and uncheck the option Client Profile.
Note When you upload the Client Profile, a checklist of forms that were completed in the prior year are shown on the Checklist tab in the client's account. See below for details.
To use Client Profile (1040):
-
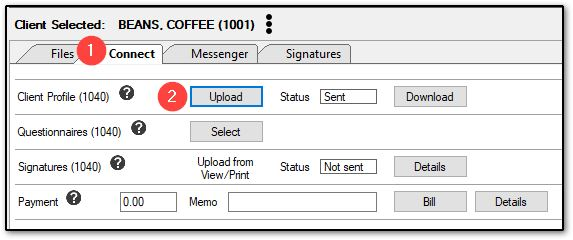
Click on the Connect tab.
-
Click Upload.
-
Enter the client’s SSN.
-
Click OK.
-
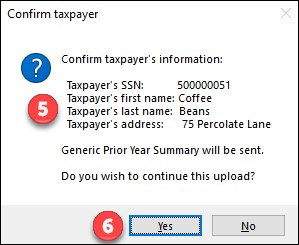
Review the taxpayer's information.
-
If the information is correct, click Yes.
-
Click OK on the confirmation window.
Note The status updates to “Sent” on the Connect tab in the Drake Portals pane.
-
The client receives an email invitation to review their uploaded profile.
-
The preparer is able to review the status of the uploaded profile on the Drake Portals pane:
-
Not Sent - The profile has not yet been uploaded.
-
Sent - The profile has been uploaded.
-
Verified - The client has reviewed and verified their profile data and the data is ready to be reviewed, downloaded, and changes imported into Drake Tax.
-
-
Once the status reads Verified, click the Download button.

-
Enter the client’s SSN on the dialog.
-
Click OK.
-
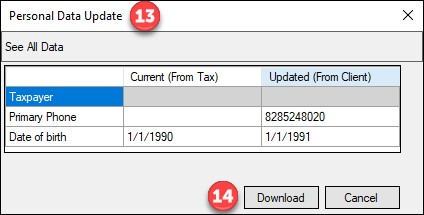
Any changes made by the client may be reviewed on the Personal Data Update window.
-
To accept the client’s changes, click Download.
-
A message appears stating that the next time the return is opened it will be filled in with the downloaded profile data.
-
Click OK to return to Drake Documents.
Note Click on the black question mark beside Client Profile for more information.
Checklist
The checklist that is uploaded automatically by clicking Upload beside Client Profile in Drake Documents is dynamic and based on the prior year data entry. While you cannot add or remove forms from the list from within Drake Documents, you can add or remove items by logging into your Drake Portals preparer portal and clicking the Checklist tab. Additional options are discussed below.
The checklist items will show on the Checklist tab of the taxpayer's portal. See Drake Portals - Taxpayer Portal for details.
Add Items
-
From your preparer portal, choose the client in the list.
-
Click on the Checklist tab.
-
Click Add Item.
-
Enter a Document Name.
-
Select a Document Type.
-
Select the Recipient (optional).
-
Select the tax Year (optional).
-
Click Add.
Review Checklist
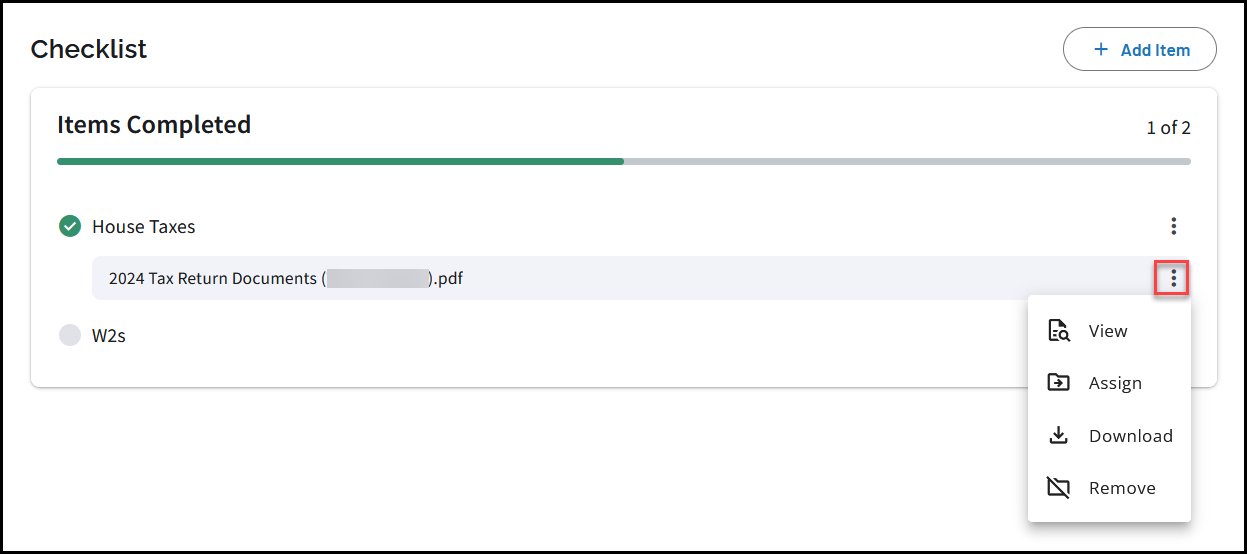
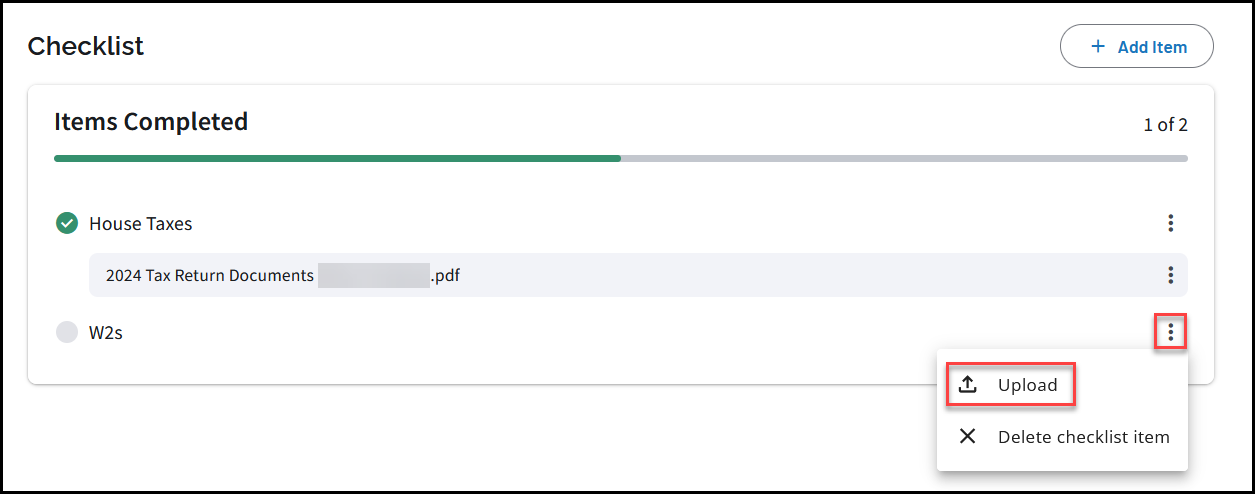
When the taxpayer has uploaded a document, you will see it listed on the Checklist tab under Items Completed # of #. You can select the menu beside the file name and View, Assign, Download, or Remove.
-
View - opens the file in a preview window.
-
Assign - select if this document should be tied to an additional checklist item.
-
Download - download the file to your computer.
-
Remove - removes the file from the checklist item (the file is still available in the Files tab > To Preparer section.
Assign Documents
You can manually assign a document to a checklist item. Click the menu beside the checklist item and choose Upload.
Select either Assign Existing File or Upload New File:
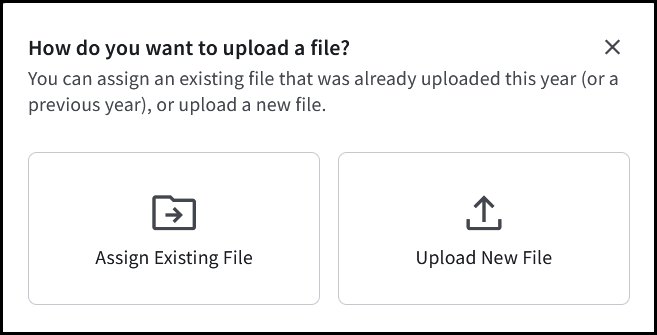
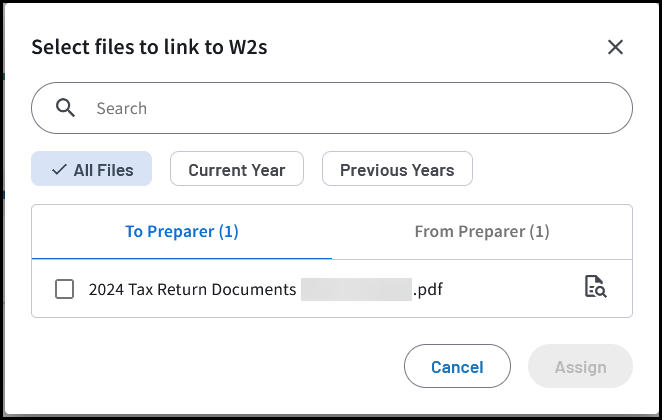
If you choose Assign Existing File, you will be able to browse through the files that exist in the client's (taxpayer's) portal, make your selection(s), then click Assign.
Delete items
You can remove a checklist item. Click the menu beside the checklist item and choose Delete checklist item. Click Yes on the Remove checklist item confirmation window.

If your client marked the item as Not Applicable, it will display this indicator below the document name in the list along with the reason that they entered (if available):

If you do not want to see this item in the checklist, you can choose to remove it by clicking the menu > Delete checklist item.