Drake Portals - Drake Tax Integration - Send or Receive Files
Article #: 15258
Last Updated: November 03, 2025

Integration of Drake Portals into Drake Documents via the Drake Portals (SecureFilePro in Drake19 and prior) pane allows quicker and easier access to Drake Portals clients by:
-
Drag and drop file transfer from Drake Documents to Drake Portals clients.
-
Drag and drop file transfer from Drake Portals clients to Drake Documents.
-
Direct transfer of images or documents captured on the Drake Portals client’s mobile device.
You have four ways to send or receive files:
Note For a video demonstration of uploading and downloading documents, see Portal Overview (Firm) and Portal Basics (End User).
Preparer View - Sending a File
To get started, follow these steps:
-
Open Drake Documents:
-
The Cabinet (Working or Archive) displays with a tree of clients on the left.
-
Documents for a selected client display on the upper right, in the Documents Pane.
-
The Drake Portals Pane displays in the lower right.
-
-
Select Search if the client is already in Portals, click Create to add them to Portals.

-
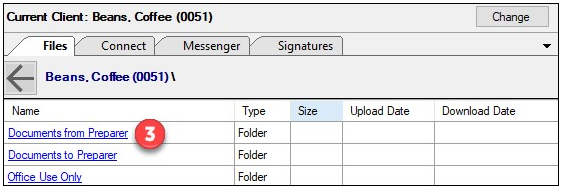
You will automatically land on the Files tab where you’ll click on Documents from Preparer to open that folder.

-
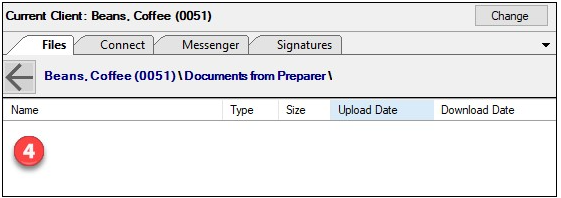
The Files tab changes to show the contents of the Documents from Preparer folder for this client. In this example, documents have not yet been uploaded.

-
In the tree to the left (Archive or Working Tree depending on whether the Archive or Working Cabinet is active), open the client’s folder (and sub-folders if needed) to locate the file to send.
-
The file will be displayed in the Documents pane.
Note You cannot add files or folders directly to the Files tab, one of the listed folders must be selected first. If you have selected the incorrect folder, press the back arrow to return to the folder selection on the Files tab.
-
-
Highlight one or more files:

-
Drag the file(s) down into the Drake Portals pane.
-
The cursor will display a + sign indicating that the document(s) will be uploaded or added to this folder. When the cursor changes, release your mouse click to upload the file.
Note You can also copy the file from the Documents pane and paste in the Drake Portals pane after selecting the destination folder by highlighting and right clicking on the file(s).
-
-
The taxpayer receives an email notification that new documents are available for review.
Note Once the client downloads the PDF, a Download Date will also display in this pane.
Preparer View - Receiving a File
When a client uploads a file, you will receive notification on the Drake Portals pane under the Notifications section and the Files tab will display a red flag indicating that you have a new item to receive.
Note You can expand the notification section by clicking on the down arrow. Clear notifications by checking the checkbox next to the notification(s). Then click the Clear button:
To receive a file:
-
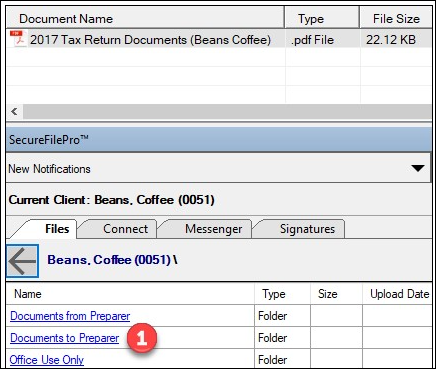
Click on the Documents to Preparer folder on the Files tab.

-
Locate the file(s) to be transferred in the Drake Portals Pane.
-
Highlight one or more files.
-
Click and drag the file(s) from the Drake Portals Pane to the Documents Pane.
-
The cursor will become a rectangle sign to indicate the document will be downloaded.
-
-
Release your mouse click to download the file.
-
The download date will display for you and your client.
Note You can also copy the file from the Drake Portals pane and paste into the Documents pane instead of using drag-drop by highlighting and right-clicking on the file(s).
-
Client View - Sending a File
Clients can use the Files tab of Drake Portals to upload files to the preparer.
To send a file:
-
Log into Drake Portals.
Note If a client is using a mobile device with a camera, they can also capture and upload images of documents.
-
Click on the Files menu.
-
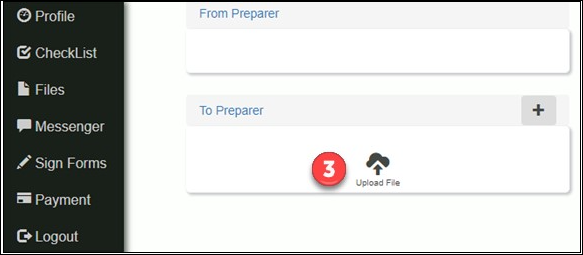
Click on Upload File in the To Preparer section.

-
A browse window opens. Locate and open the desired file(s).
Note If a client is using a mobile device with a camera, they can also capture and upload images of documents.
-
A status bar shows that a file was uploaded and lists the name of the file. The Upload File icon shows Upload File Status of 100%.
-
If needed, the client can click the three dots icon on the right to make changes to the uploaded file.
Note Once the file is uploaded, the preparer receives notification and is able to download it.
Client View - Receiving a File
When a preparer uploads files to a client using Drake Portals, the client receives an email notification and link to download the files.
To receive a file:
-
The client clicks on the link in the email notification.
-
The client enters their Username and Password on the Drake Portals login screen.
-
Click Login.
-
The client is taken directly to the Files section.
-
A red number indicating how many files are available will be displayed to the left of Files indicating a new file is available.
-
The client can also select Files from the list if logging in from a bookmarked page.
-
-
The client clicks the Download icon.

Note The preparer will see the date and time that the client downloaded the file in the Drake Portals pane.