

Last Updated:
Article #: 15084
A bank reconciliation compares the account balance of a current asset account against the bank balance for that account. The journal does not have to be posted to the Chart of Accounts prior to running a bank reconciliation. Once a bank reconciliation using a given Account and Statement Date has been finished, that same Account and Statement Date combination cannot be reconciled again.
Caution Bank Reconciliation only pulls transactions back 13 months from the Statement Date. For a full and complete Bank Reconciliation, both sides must balance.
-
To load transactions, go to Accounting > Bank Reconciliation.
-
In the Account field, select an account from the drop list.
-
Only postable Current Asset and Current Liability with a sub-type of credit card accounts from the Chart of Accounts are listed.
-
-
In the Statement Date field, enter the last date to be included in the bank reconciliation.
-
Enter the Starting Balance, which is the previous month’s Ending Balance.
-
Enter the Ending Balance.
-
Click Load Trans.
-
All of the transactions that were entered in the journal will populate under Book Report (on the left).
-
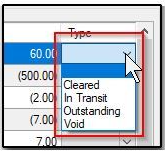
To clear a transaction, select Cleared in the Type column.
-
If the transaction is still in transit, select In Transit.
-
If the transaction is outstanding or void, make the appropriate selection.
-
-
If you want to add transactions, click Journal Entry on the far right.
-
Use manual journal entries to enter bank-initiated items such as interest and penalties or to make corrections. All manual entries to the journal must have an offsetting entry.
-
Once the reconciliation process is complete, click Finish.
See the video Bank Reconciliation for a demonstration of this process.
Method 1: Printed Bank Statements
If you mistakenly include a transaction in the Bank Report, select the transaction and click the delete icon. The transaction is removed from the Bank Report and will require a Type be assigned.
To begin reconciling the account with a printed bank statement:
-
Select a transaction on the bank statement, and click on that same transaction located in the Book Report listing on the left side of the window.
-
To clear the transaction, click the right arrow icon.
-
The transaction will be displayed in both the left window with a Type of “Cleared” and in the right window (Bank Report).
-
The numbers at the bottom of the screen in the Cleared section below the left and right windows are updated to reflect the amount cleared.
-
-
Continue selecting transactions on the left and clicking the right arrow icon until all transactions on the bank statement that have cleared show a Type of “Cleared” in the left window and are listed in the Bank Report window (right).
-
Assign a Type to all other transactions in the Book Report that have not cleared.
-
If necessary, click Journal Entry to add transactions.
-
Use manual journal entries to enter bank initiated items, such as interest and penalties, or to make any other corrections.
-
For instance, a check appears on the bank statement but is not displayed on the Bank Reconciliation screen.
-
Remember that all manual entries to the journal must have an offsetting entry.
-
To be included in this reconciliation, the transaction date must be no later than the Statement Date.
-
Once manual journal entries have been saved, you are returned to the Bank Reconciliation screen and the manual journal entry is included in the Book Report.
-
-
-
If necessary, click Edit Posted to bring up the Previously Posted Transactions screen.
-
Edit entries as needed.
-
Click Confirm Edits when finished.
-
Click View Logs to view journal entry history, if needed.
-
Click Exit when finished to return to the Bank Reconciliation screen.
-
-
Under Print Options, select to display an Unreconciled report showing only the transactions that have not cleared or a Reconciled report showing just the transactions that have cleared. Select to display both reports when the reconciliation has been finished.
-
If you have already begun a reconciliation and click Reset, a prompt will display and ask if you wish to return to the Bank Reconciliation screen and continue it, Save Partial (save what you have done so far), Do Not Save (clear the progress that has been done), or Cancel.
-
If you click Save Partial, exit the Bank Reconciliation screen, and return when you are ready to complete it, select the account that the partial was saved on.
-
A prompt will display. Click Yes to load the Bank Reconciliation and continue working on it.
-
-
-
Once the reconciliation process is complete, click Finish. A reconciliation report opens that can be saved or printed.
Once a bank reconciliation using a given Account and Statement Date has been finished, that same Account and Statement Date combination cannot be reconciled again.