Drake Accounting - Entering Payroll Benefits
Article #: 15119
Last Updated: September 01, 2026

All benefits must first be entered for the employer and then assigned to each employee, as needed. A benefit cannot be deleted from the employer’s list if it is setup as a benefit for one or more employees. There is no limit to the number of benefits that may be set up for the employer.
Important Benefits and deductions are set up separately. If an employee pays a portion of a benefit through payroll (for example, a health insurance premium), set up the employer benefit first, then set up the matching employee deduction. See Drake Accounting - Match Benefit and Deduction . For 401(k) plans, set up the employee deferral as a deduction and configure employer matching at Employees > Options > Payroll Options tab. See Drake Accounting - 401(k) Plan Setup.
Watch the Deductions and Benefits video for a demonstration.
Employer Setup
Unlimited benefits can be set up for the employer. To do so, follow these steps:
-
From the side menu, select Employees > Deductions & Benefits.
-
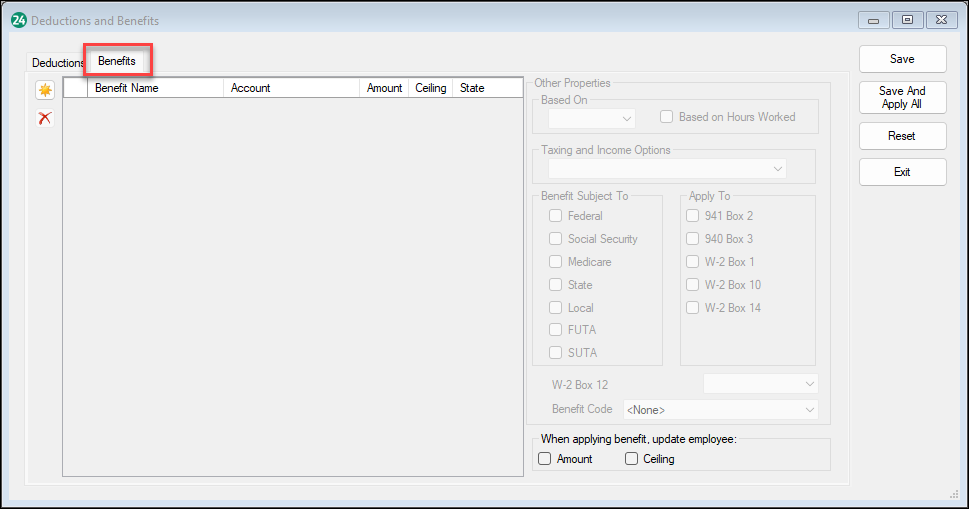
Select the Benefits tab towards the upper left of the window.
-
Select the New
 button at the top left. A blank row is added to the Benefits grid, and the Other Properties section is activated.
 -
Complete the following benefit information, as necessary:
-
Benefit Name: Enter the name of the benefit (not the name of an employee). This appears as the name of the benefit on the pay stub.
-
Account: (if using the bookkeeping function) Click the drop list to access the postable Chart of Accounts list.
Amount: Enter the benefit amount.
-
Format the number as dollars and cents, if needed.
-
If the benefit is based on a percentage, enter the amount as a decimal value less than 1 with unlimited decimal places (such as .05 for 5%).
-
-
Ceiling: Enter the maximum yearly benefit.
Note When the employee reaches the ceiling amount for the year, Drake Accounting discontinues this benefit for that employee.
-
State:
-
For multi-location employees, select the specific state to which this benefit applies.
-
When choosing a specific state, the benefit will apply to payroll in that state only.
-
Select <ALL> to have the benefit apply to payroll in all states.
-
-
-
Complete the following information for Other Properties, as necessary:
-
Based On - Select Dollars/Cents or Percent, as applicable.
-
If Based on Hours Worked is selected, the benefit is calculated by multiplying the Hours Worked (located at Employees > Payroll > Live or ATF) by the benefit Amount.
-
If Based on Hours Worked is not selected, the benefit is calculated by multiplying the total Gross Pay (located at Employees > Payroll > Live or ATF) by the benefit Amount.
-
-
Taxing and Income Options - Select the option that describes how the benefit is taxed and applied to pay:
-
Not Taxed - Not Applied to Gross or Net Pay - The benefit is not taxed and does not affect gross or net pay. The amount does not transfer to the Journal if the bookkeeping function is used.
-
Not Taxed - Apply to Net Pay Only - The benefit is not taxed, but the amount is added to net pay.
-
Taxed - Apply to Gross and Net Pay - The benefit is taxed based on the Benefit Subject To selections and the amount is added to gross and net pay.
-
Taxed - Not Applied to Gross or Net Pay - The benefit is taxed but the amount is not added to gross or net pay. The amount does not transfer to the Journal if the bookkeeping function is used.
-
Taxed - Apply to Gross Only - The benefit is taxed based on the Benefit Subject To selections and is added to gross pay only.
-
(Starting with DAS26) Include Tips - Includes tips (direct and indirect tips) into the calculation of the Benefit
-
The option is disabled when Dollar/Cents is selected in the Based On drop down. It is also disabled when Based on Hours Worked is checked.
-
Note If Benefit Subject To or Apply To check boxes are grayed out, the selected Taxing and Income Option controls which fields are available. Select the taxing option first, then complete Benefit Subject To and Apply To.
-
-
Benefit Subject To - Select the applicable boxes if the benefit is taxable (Federal, Social Security, Medicare, State, Local, FUTA, SUTA).
-
Apply To - Select the applicable boxes to include the benefit on federal or state forms and on the employee's Form W-2:
-
941 Box 2 - Available when the benefit is not taxed. Checked by default.
-
940 Box 3 - Available when the benefit is not taxed. Checked by default.
-
W-2 Box 1, W-2 Box 10, W-2 Box 14 - Select any that apply.
-
-
W-2 Box 12 - Indicate the code to be used on box 12 of the employee's Form W-2 during W-2 processing.
-
Benefit Code - Select the applicable benefit code, if needed.
-
-
Click Save after entering each benefit. Choose Reset to revert all information for the current benefit to its previously saved state.
Note Clicking Save And Apply All updates the amount and/or ceiling setting for each employee who has the corresponding benefit assigned to them. Mark the Amount and/or Ceiling check boxes when applying a benefit. Update employees to control which fields are pushed to employees.
-
Add additional benefits as necessary, clicking Exit when finished.
Employee Setup
-
Go to Employees > Employee Setup.
-
Select the employee for whom to apply benefits, then select the Benefits tab.
-
Select the applicable Available Benefit Name and click the right arrow
 to assign the benefit to the employee. The benefit is displayed as Employee Benefit Name.
 -
Double-click the Amount or Ceiling to make edits, if necessary.
-
Once you add all desired benefits, click Save.
Note Adding a benefit that is matched to a deduction at the employer level automatically adds the linked deduction on the employee Deductions tab. See Drake Accounting - Match Benefit and Deduction .
To remove a benefit from an employee's list, select the benefit in the right pane and select the left arrow  icon to put the benefit back in the left pane. Select Save when finished.
At the bottom-right are check boxes for Amount and Ceiling. If marked, pressing F3 reverts the benefit amount and/or ceiling to the default figure established at Employees > Deductions & Benefits > Benefits tab.
Editing Benefits
To edit a benefit that has already been setup:
-
Go to Employees > Deductions & Benefits.
-
Select the Benefits tab followed by the appropriate benefit to be edited.
-
Make necessary changes. It is possible to edit multiple benefits before saving.
-
Click Save to return to the Client Selector.
Note The changes are not automatically applied to employees. To apply the benefit changes to all employees currently set up with the benefit, choose Save And Apply All.
To update the benefits assigned to the employee(s):
-
Go to Employees > Employee Setup.
-
Select the employee that is to be updated.
-
Select the Benefit tab followed by the appropriate benefit.
-
With the benefit selected, you can:
-
Press F3 to update to default amounts that were set.
-
Manually enter the new amount for the employee.
-
-
Click Save to return to the employee list.
-
Return to Step 1 if additional employees require updates
-
Note Changes made under Deductions & Benefits and/or Employee Setup will not affect existing payroll.